简介
本文主要内容:
1.介绍Python的概念
2.演示配置常用的两者Python环境
一种是VS Code
一种是PyCharm(提供一种专业版激活方式)
3.介绍Python的部分语法
4.演示一些Python项目的实现
5.在Python项目演示中使用VS Code编写Python程序
Python官网:https://www.python.org/
一.Python的概述
Python 是一种广泛使用的高级编程语言,因其简洁、易读和高效而受到开发者的喜爱。Python 由 Guido van Rossum 于 1980 年代末期设计,并在 1991 年首次发布。它是一种解释型语言,支持多种编程范式,包括面向对象编程、命令式编程、函数式编程和程序化编程。
1.Python的主要特点
-
简洁易学:
- Python 的语法非常简洁,接近自然语言,因此适合初学者学习。它有明确的缩进规则,避免了使用大量的括号或花括号来分隔代码块。
-
跨平台支持:
- Python 可以运行在多种操作系统上,包括 Windows、Linux、macOS 等。只要安装了 Python 解释器,几乎所有平台都能运行 Python 程序。
-
解释型语言:
- Python 是一种解释型语言,意味着代码在运行时逐行解释执行,不需要编译步骤。这样可以加速开发流程,并且方便调试和交互式操作。
-
动态类型:
- Python 是动态类型语言,在程序运行时确定数据类型,不需要提前声明变量的类型。这使得 Python 更加灵活,但也可能导致一些运行时错误。
-
广泛的标准库和第三方库:
- Python 提供了大量的标准库,涵盖了从文件操作、网络通信到数据库交互等各种功能。此外,还有丰富的第三方库和框架,像 NumPy(科学计算)、Pandas(数据分析)、Flask 和 Django(Web 开发)等,这些库扩展了 Python 的应用范围。
-
面向对象:
- Python 支持面向对象编程(OOP),允许创建类和对象,支持继承、多态、封装等 OOP 特性。尽管如此,Python 也支持其他编程范式,因此在 Python 中,你可以使用面向过程的方式进行开发。
-
社区支持:
- Python 拥有一个活跃的开发者社区,提供了大量的教程、论坛、开源项目和文档支持。这使得学习和解决问题变得更加容易。
-
适用于多种应用领域:
- Python 在多种领域有广泛的应用,包括但不限于:
- Web 开发(Flask, Django)
- 数据科学与机器学习(NumPy, Pandas, TensorFlow, Scikit-Learn)
- 自动化脚本(文件操作、网络请求等)
- 软件开发(桌面应用、游戏开发等)
- 系统管理与运维
- Python 在多种领域有广泛的应用,包括但不限于:
2.Python的优势
- 易于学习和使用:Python 以其简单的语法和明确的结构而闻名,非常适合编程初学者。
- 开发效率高:Python 的高级语法和丰富的库使得开发者能够快速开发功能强大的应用程序。
- 丰富的社区资源:Python 拥有一个非常活跃的开发社区,开发者可以轻松获取大量的文档、教程和开源项目。
- 广泛的应用场景:从Web开发到科学计算,Python 适用于几乎所有类型的应用开发。
3.Python的缺点
- 运行速度相对较慢:作为解释型语言,Python 的执行速度比编译型语言(如 C++ 或 Java)要慢。这对于一些对性能要求极高的应用(如游戏开发、嵌入式系统)可能是一个限制。
- GIL(全局解释器锁):由于 Python 的 GIL 特性,多线程编程时只能同时运行一个线程,这在处理 CPU 密集型任务时可能会影响性能。
4.Python主要应用领域
-
Web 开发:
- Python 拥有强大的 Web 开发框架,如 Django 和 Flask,它们让 Web 开发更加简洁高效。Python 可以用于构建网站、Web 应用以及 API 服务。
-
数据分析与数据科学:
- Python 是数据科学领域的首选语言之一。它通过库如 NumPy、Pandas、Matplotlib 等提供强大的数据处理和分析功能。同时,Python 在机器学习和人工智能领域也有着广泛的应用,库如 TensorFlow、Keras、Scikit-learn 提供了易于使用的接口。
-
自动化脚本和任务调度:
- Python 常用于编写自动化脚本,帮助开发者处理日常任务,如文件处理、自动化测试、Web 数据抓取等。
-
人工智能与机器学习:
- 由于其简洁的语法和强大的第三方库,Python 已成为机器学习、深度学习和人工智能的主要编程语言之一。
-
科学计算与数值分析:
- Python 提供了大量的数学和科学计算库,如 SciPy、SymPy 和 Matplotlib,非常适合用于物理学、工程学等领域的研究。
-
桌面应用开发:
- 虽然 Python 不是开发高性能桌面应用的首选,但它依然可以用于开发桌面应用程序。框架如 Tkinter、PyQt 和 Kivy 可以帮助开发跨平台的桌面应用。
5.总结
Python 是一种非常灵活和强大的编程语言,凭借其简洁的语法和丰富的库,已成为各个领域(如 Web 开发、数据科学、自动化等)的首选语言。无论是初学者还是经验丰富的开发者,Python 都是一个很好的编程选择。
二.Python解释器
1.Python 解释器的作用
-
执行 Python 代码:
- 解释器将 Python 程序的源代码转换为机器能够理解的指令,并逐行执行。与编译型语言(如 C 或 C++)不同,解释型语言直接逐行解释和执行代码,而不是先将整个程序编译成可执行文件。
-
语法检查和错误报告:
- 解释器在执行代码时,会检查代码的语法错误。如果 Python 程序有语法错误,解释器会在执行过程中抛出错误并提供错误信息,帮助开发者修正代码。
-
内存管理:
- Python 解释器负责管理内存。它会自动为对象分配内存,并使用垃圾回收机制来清理不再使用的内存空间,从而减少内存泄漏的可能。
-
提供交互式环境:
- Python 解释器可以提供一个交互式的命令行环境(也叫 REPL 环境:Read-Eval-Print Loop),允许开发者直接输入代码并立即看到结果。这对于快速测试、调试和学习 Python 很有帮助。
-
跨平台支持:
- Python 解释器使得 Python 程序能够在不同的平台(如 Windows、macOS 和 Linux)上运行,而不需要做太多的修改。开发者只需要安装对应操作系统的 Python 解释器。
2.下载python解释器
官网:https://www.python.org/downloads/
从Python官网下载的 Python 解释器通常是 CPython,即 Python 的官方实现。CPython 是最常用和最流行的 Python 解释器,它由 C 语言编写,并且是 Python 官方推荐的版本。
1.下载并打开安装包

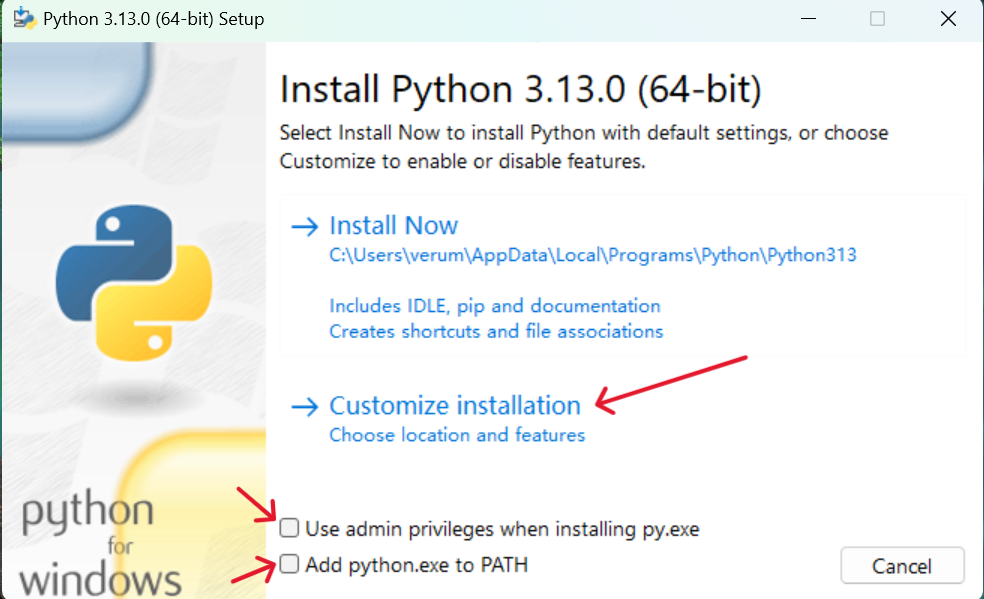 2.勾选下面两个选项,至少第二个要勾选
3.然后选择Customize installation(自定义安装)
注释:
Install Now就是默认安装到当前用户下
Customize installation可以自定义安装路径和一些选项
第一个选项是使用管理员权限安装 py.exe(python启动器,用于在 Windows 上更方便地管理和运行不同版本的 Python),会将它安装到系统目录(C:\Windows),否则安装到当前用户目录下
第二个选项是把解释器添加到系统路径,能够使得你在任何命令行窗口中直接运行python命令,而不需要指定 Python 的完整安装路径
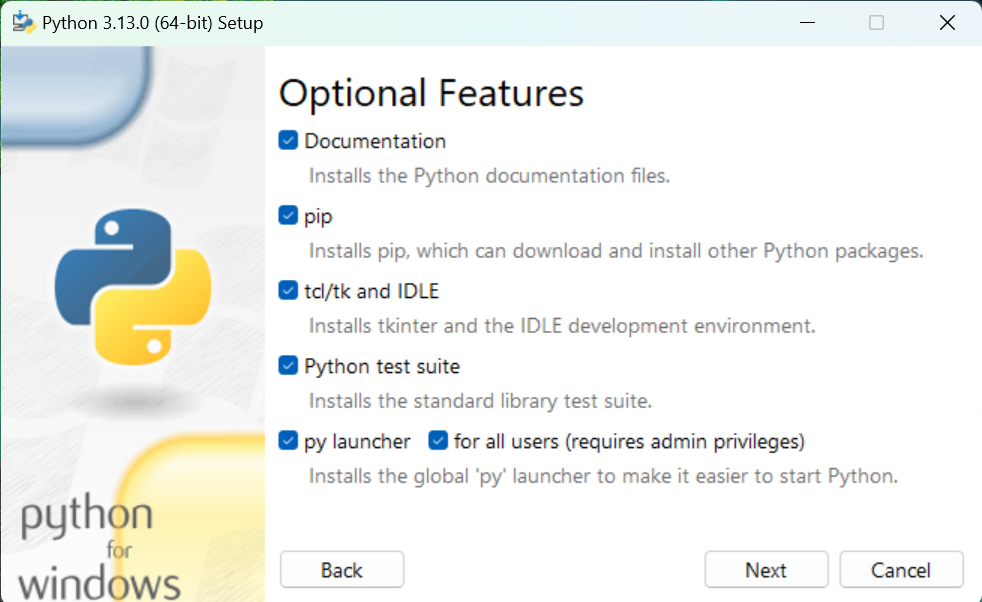
4.这是默认的配置,不用修改,点击Next
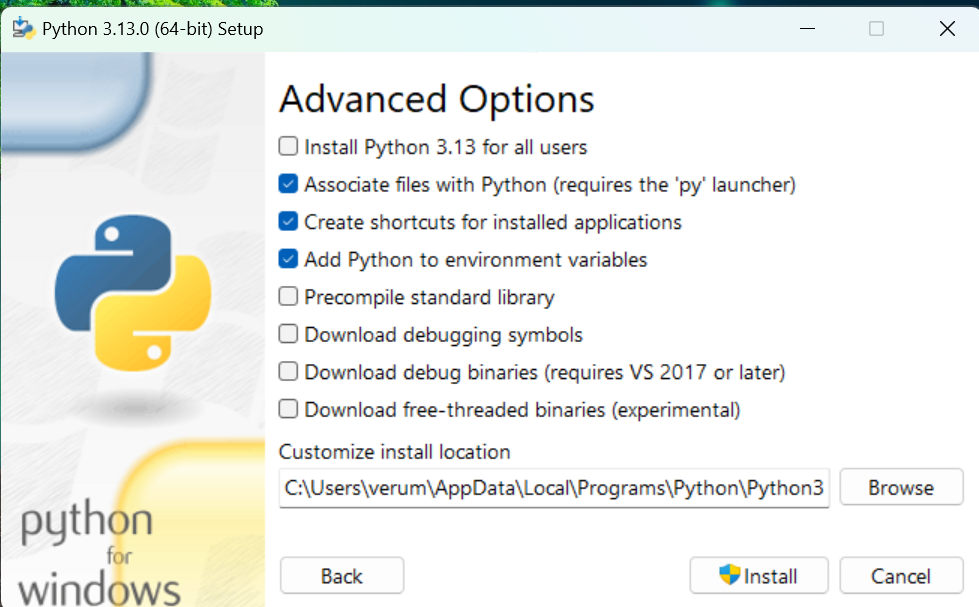
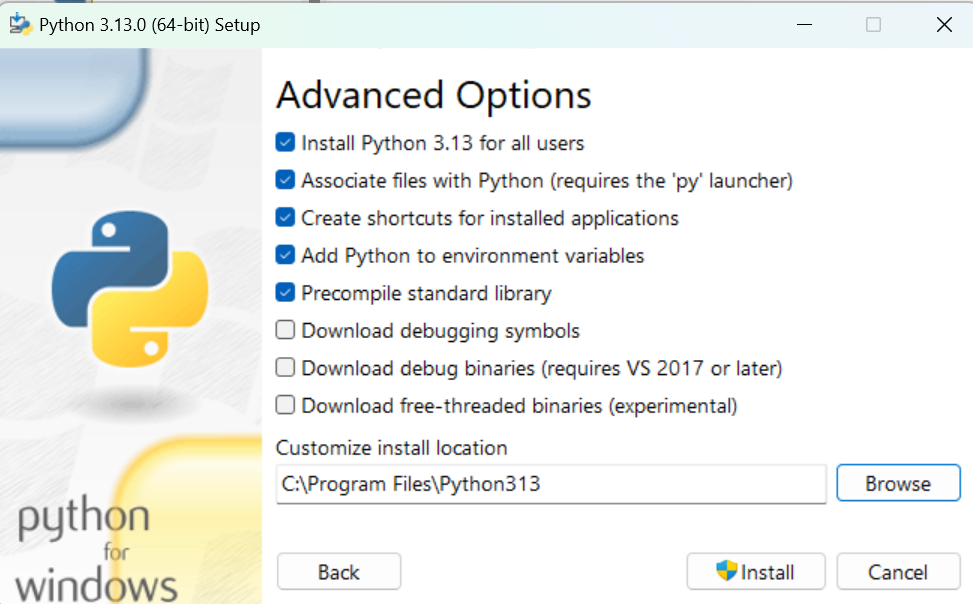
 5.这里可以选择安装到所有用户,这时安装路径就会变成一个公共文件夹
 6.安装
6.安装
三.配置Python环境(VS Code)
1.下载VS Code
网址:https://code.visualstudio.com/

2.配置中文环境
1.打开扩展
 2.在搜索栏中搜索Chinese
3.选择简体中文安装
4.重启

3.安装插件
3.1.python 插件
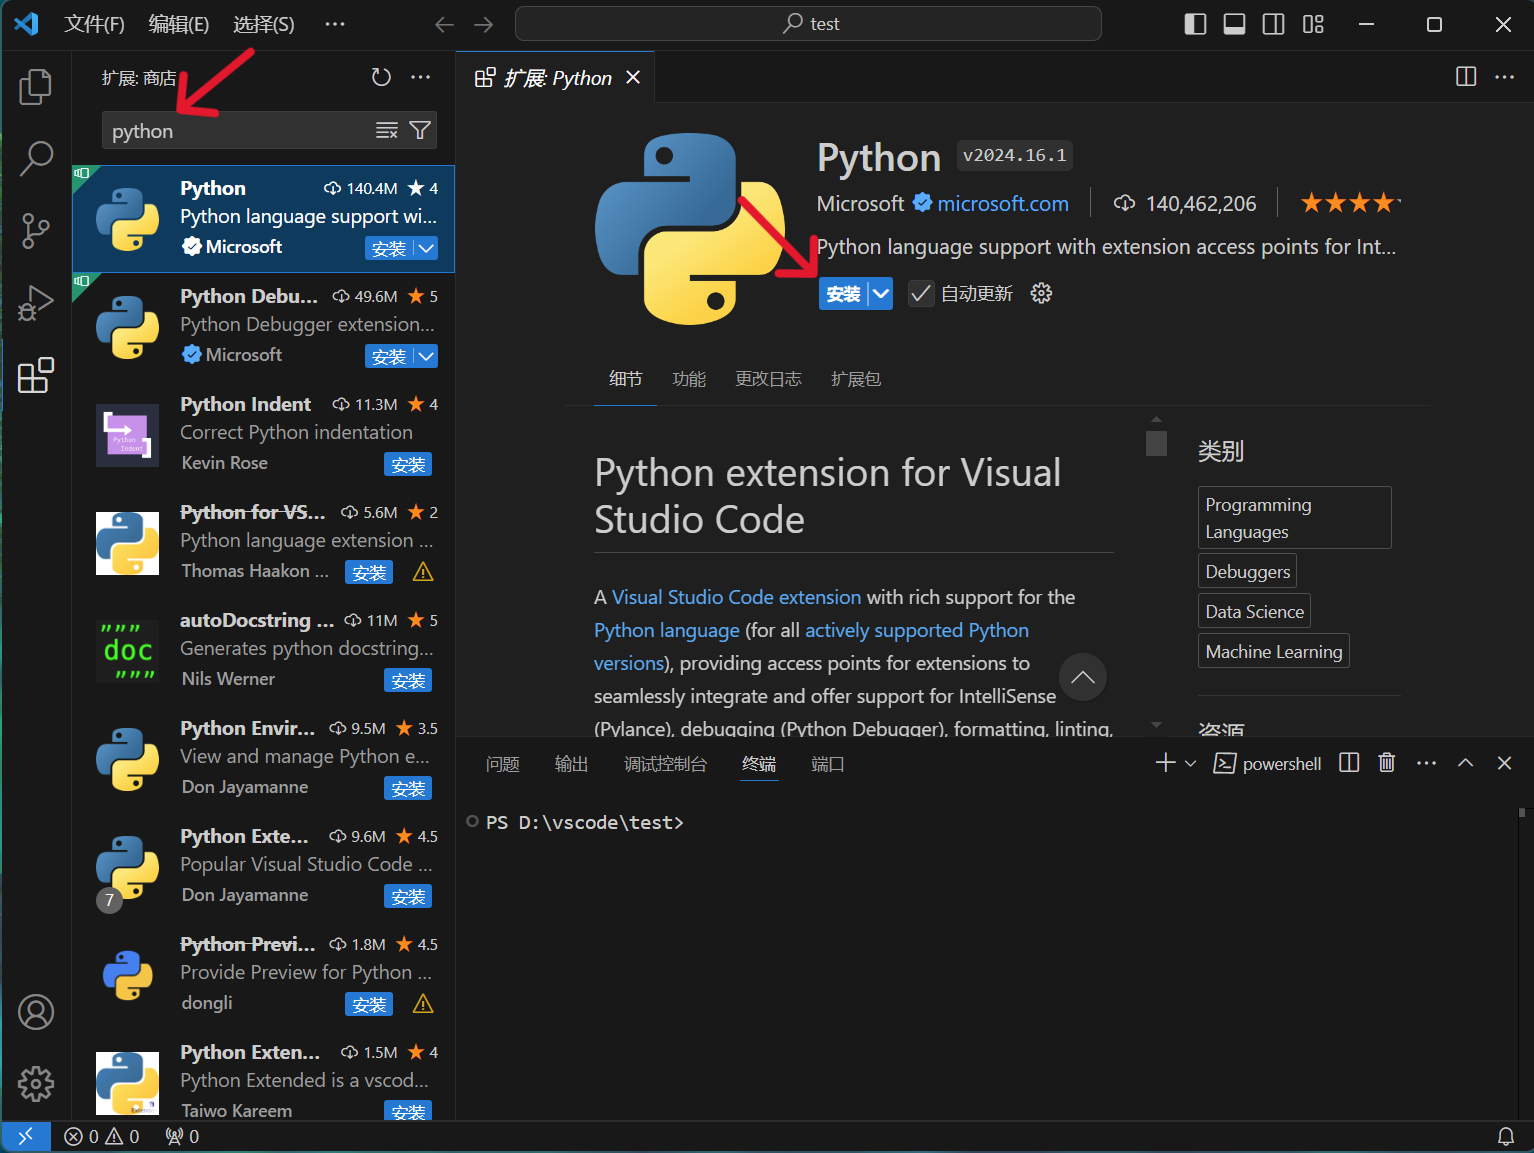 主要功能:
主要功能:
- 代码智能提示:提供 Python 代码的自动补全、函数参数提示、变量/函数定义跳转等功能。
- 调试支持:集成调试器,可以直接在 VS Code 中进行 Python 代码的调试,设置断点、变量监视和调用堆栈查看等。
- 代码检查:支持代码静态分析工具,如 Pylint 和 Flake8,帮助你发现代码中的潜在错误和格式问题。
- 虚拟环境和 Conda 支持:可以轻松选择和管理不同的 Python 解释器、虚拟环境或 Conda 环境。
- Jupyter 支持:可以在 VS Code 中直接运行 Jupyter Notebooks,进行交互式的 Python 开发,特别适合数据科学工作流。
- 测试集成:支持常用的测试框架(如 unittest、pytest),便于运行和调试测试用例。 这个插件是 Python 开发者在 VS Code 中工作的基础工具,帮助进行代码编写、调试、测试和管理开发环境。
3.2.Python Extension Pack 插件
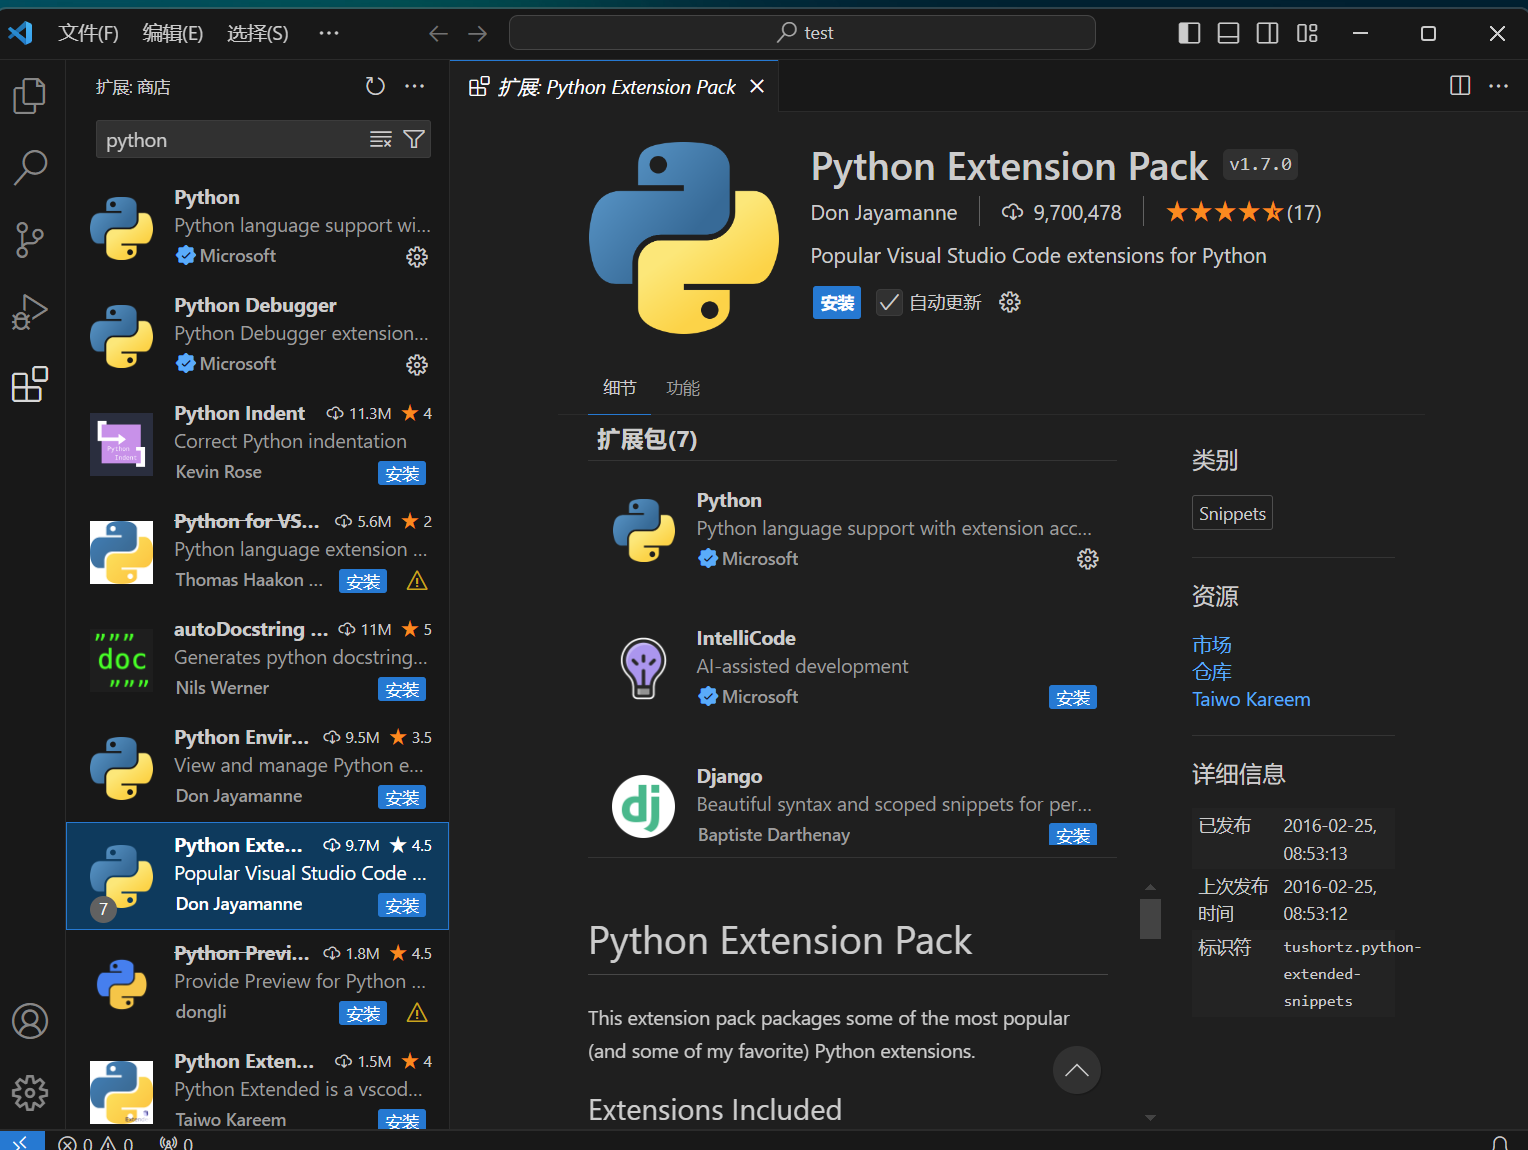 主要功能:
主要功能:
Python Extension Pack 是为 Visual Studio Code 的 Python 开发者设计的一组插件包,包含了多个非常有用的扩展,主要包括:
- Python - 提供核心功能,如代码检查(linting)、调试(包括多线程和远程调试)、智能感知(IntelliSense)、代码格式化、重构、单元测试,以及用于数据科学任务的 Jupyter Notebook 支持。
- Jinja - 提供 Jinja 模板语言的语法高亮和代码片段。
- Django - 为 Django Web 开发添加了特定的语法和代码片段。
- IntelliCode - 基于机器学习的 AI 辅助工具,帮助提供智能代码补全和建议。
- Python Environment Manager - 帮助你在 VS Code 中查看和管理 Python 环境及其依赖包。
- Python Docstring Generator - 辅助自动生成 Python 函数和类的文档注释。
- Python Indent - 自动纠正 Python 代码的缩进。
4.编写Python程序
1.创建一个文件
 2.通过VScode打开你上面创建的文件
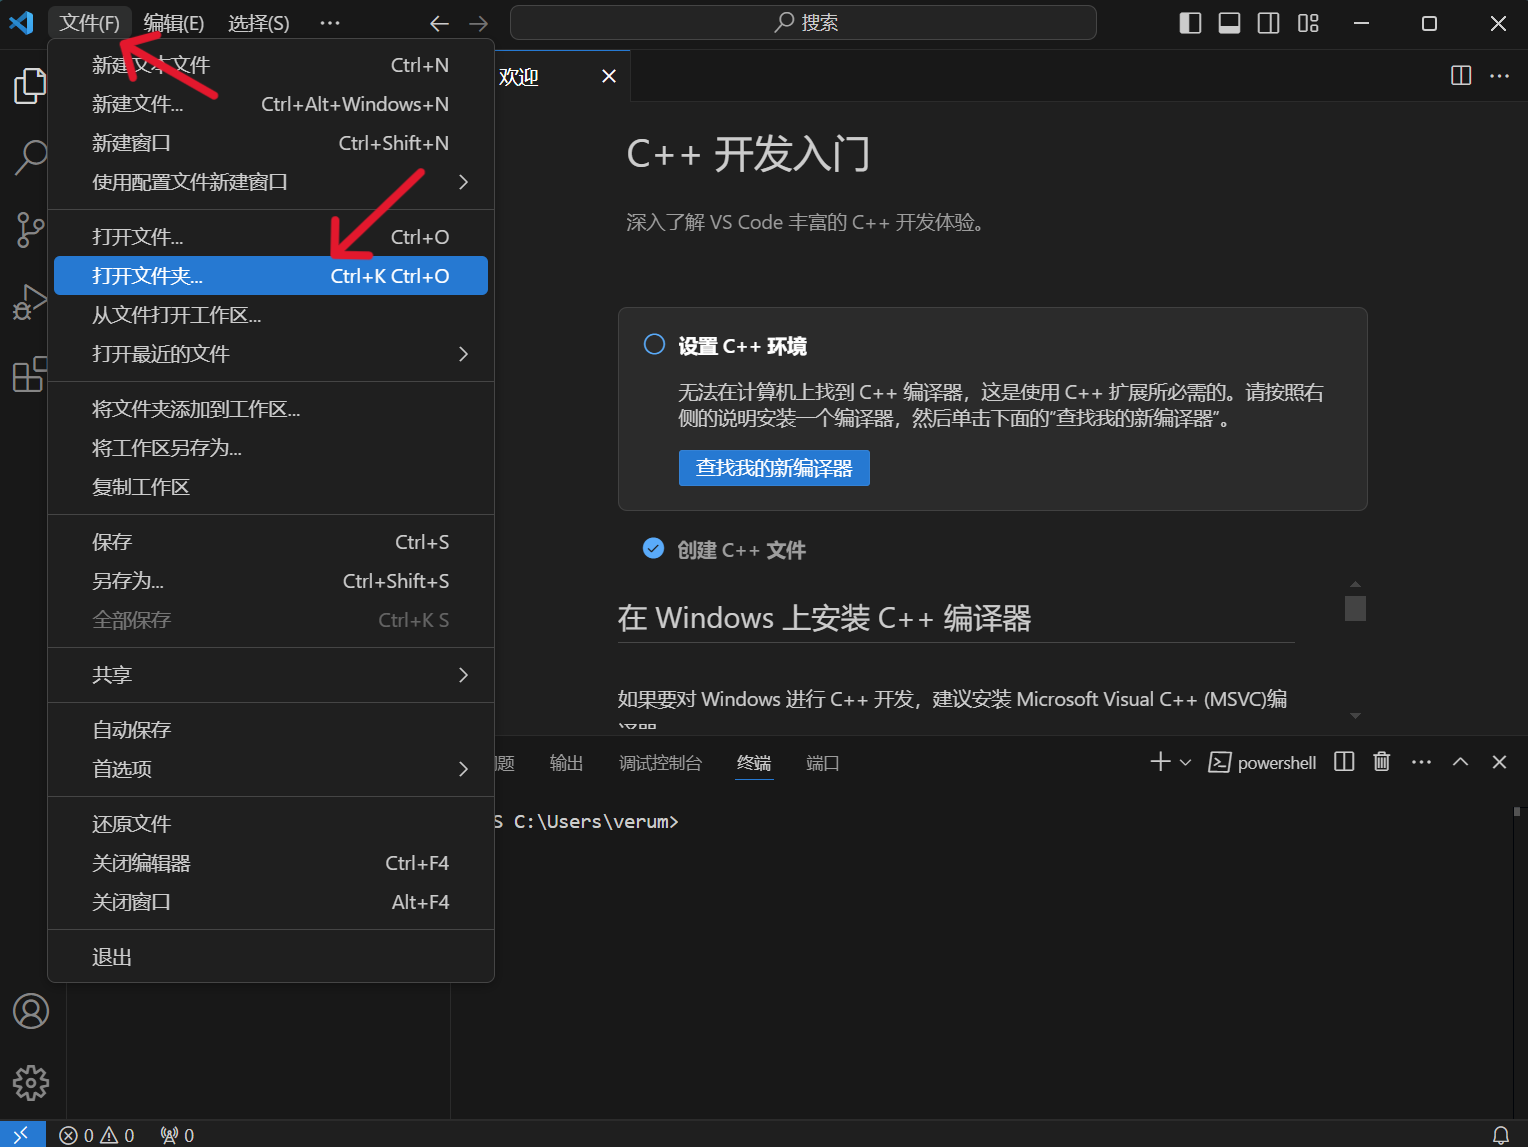 3.新建文件,后缀需为.py
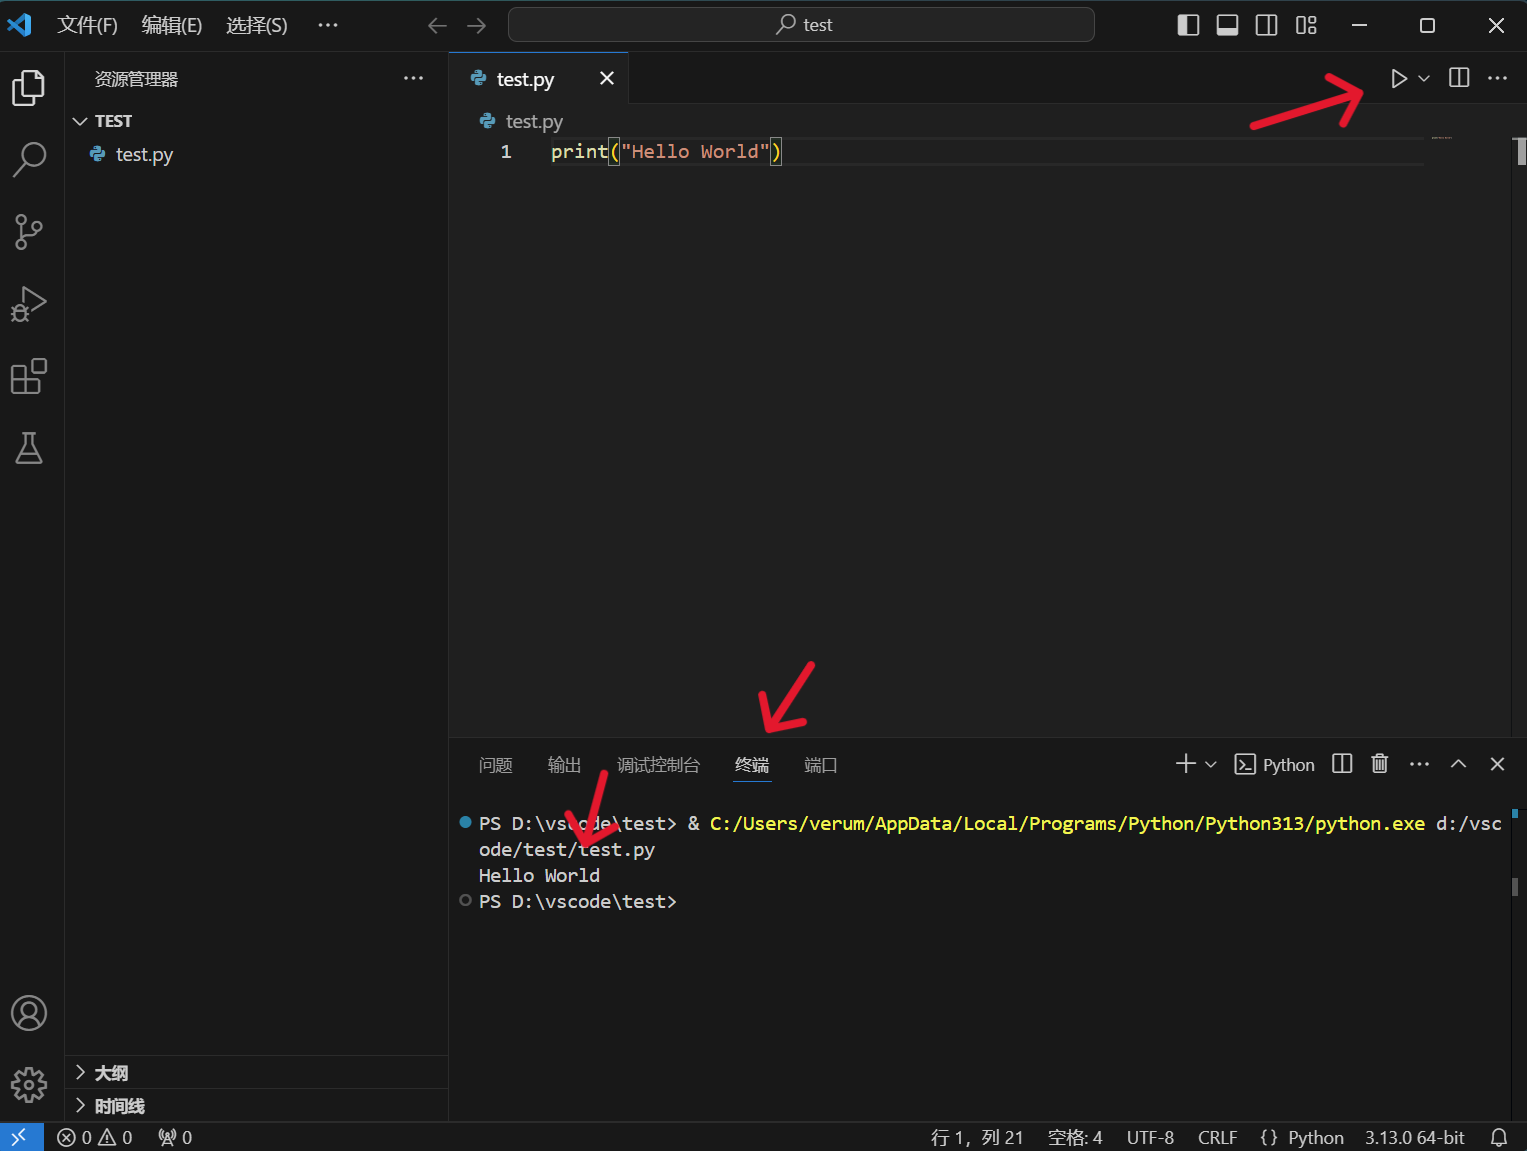
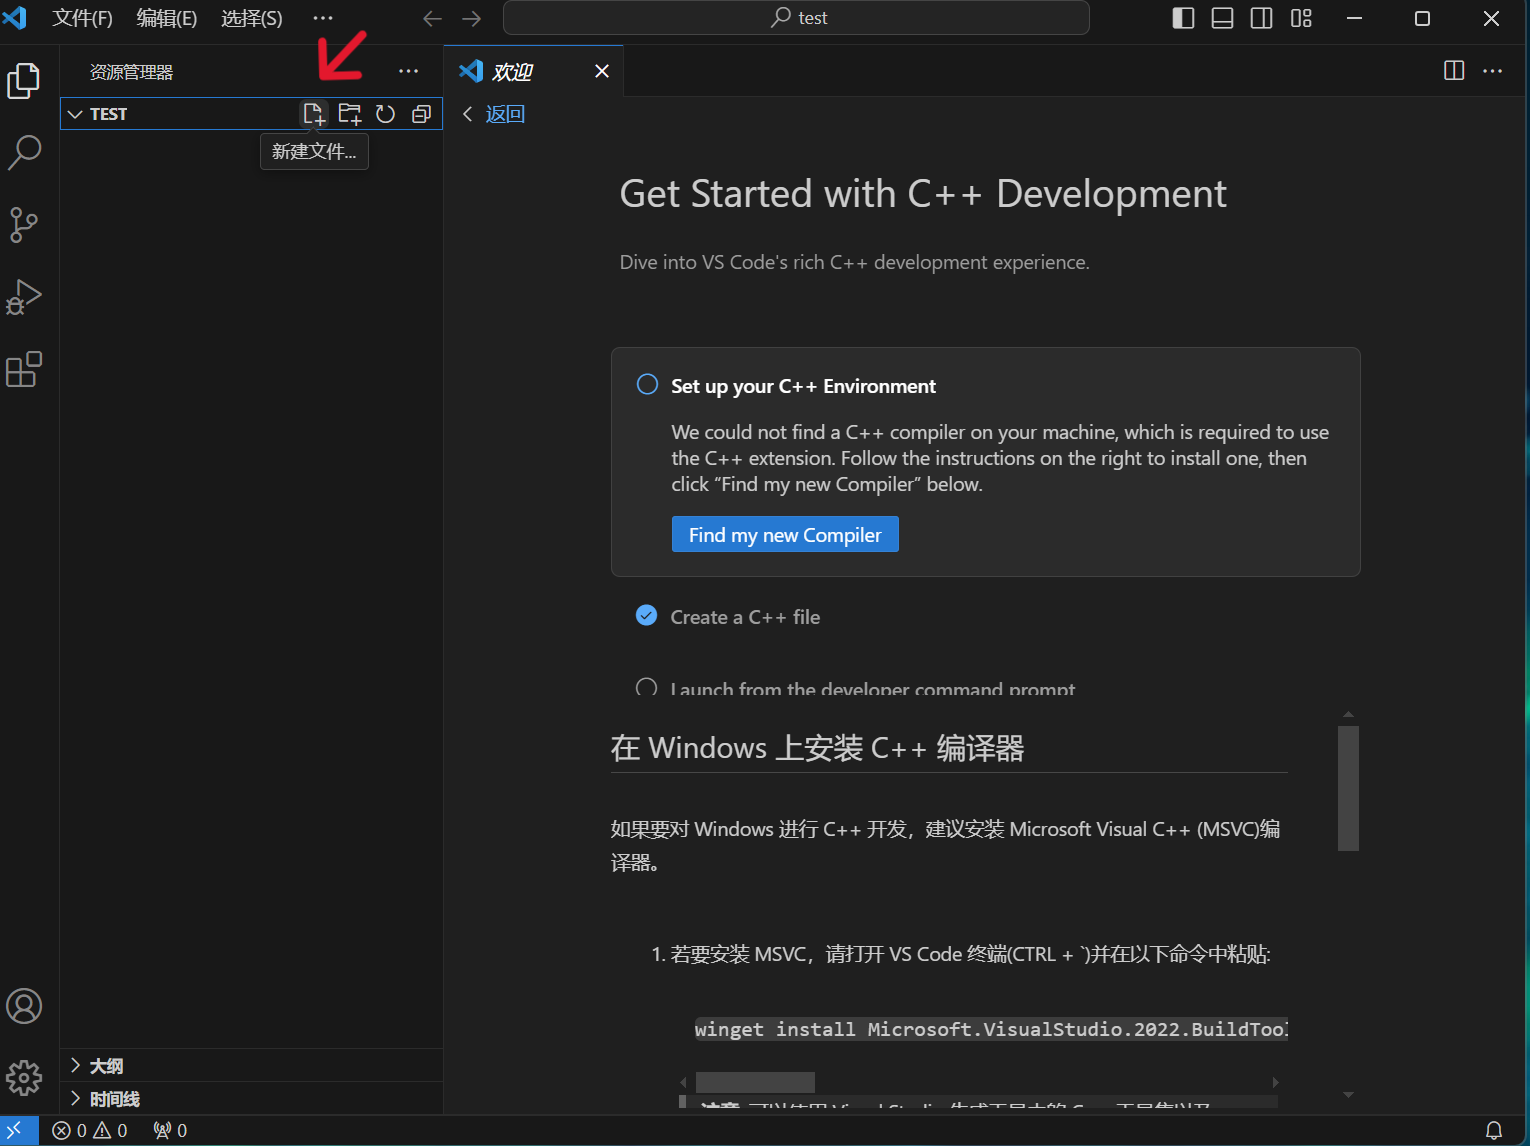 4.编写代码并运行,可以在终端看到输出结果
四.配置Python环境(PyCharm)
可以选择下载免费的社区版,仅用于学习是绰绰有余
当然也可使用专业版,可以购买正版获得许可证,也能通过其他方式低成本获得激活(网上购买激活码或让商家激活账号,当然这些是不正规的),接下来会演示一位大神提出的激活方式,仅为交流学习,并不提倡使用盗版
如果你选择使用社区版,就在下载时选择社区版,并跳过激活专业版的教程
理论上该方法可以激活Jetbrains全家桶的每个软件
1.PyCharm专业版与社区版的区别
PyCharm 是由 JetBrains 开发的一款广受欢迎的 Python 集成开发环境(IDE)。它有两个版本:专业版(Professional) 和 社区版(Community)。这两个版本在功能上有所不同,下面是它们的主要区别:
1.1. 价格
- 社区版(Community):免费,开源。适合个人开发者、学习者或者对功能需求较少的用户。
- 专业版(Professional):收费版本,需要购买许可证。它提供了更多的高级功能,适用于企业用户、专业开发者和需要高级功能的团队。
1.2. 支持的开发环境
-
社区版:
- 主要支持 Python 开发。
- 支持基本的编辑、调试和版本控制。
- 提供 Python 项目的基本功能,如代码补全、语法高亮、代码导航、调试等。
-
专业版:
- 完整的 Python 开发支持,包括 Flask、Django 等框架的支持。
- 支持Web 开发(HTML、CSS、JavaScript 和前端开发的功能)。
- 提供数据库工具,可以与数据库进行交互,如连接、查询和编辑数据库。
- 支持科学计算和数据分析,包括与 Jupyter Notebooks 的集成。
- 支持 Docker 和 远程开发,适合容器化开发和使用远程开发环境。
1.3. Web 开发支持
- 社区版:不支持 Web 开发框架。
- 专业版:支持 Web 开发框架,如 Django、Flask、Pyramid 等,且包含 Web 调试、模板编辑、前端开发等功能。
1.4. 数据库支持
- 社区版:没有内置数据库支持。
- 专业版:提供强大的数据库工具,允许你连接、编辑和查询关系型数据库(如 MySQL、PostgreSQL、SQLite、Oracle 等),并且能够在 IDE 内部直接执行 SQL 查询。
1.5. 科学计算与数据科学支持
- 社区版:不支持数据科学的相关功能。
- 专业版:提供对数据科学、科学计算的支持,包括对 Jupyter Notebooks、Pandas、NumPy 等库的集成,方便数据科学家和研究人员使用。
1.6. 远程开发和部署
- 社区版:不支持远程开发和容器化部署。
- 专业版:支持远程开发、部署和调试,支持使用 Docker、Vagrant、SSH 等技术进行远程开发,适用于在云服务器或虚拟机上进行开发。
1.7. 支持的框架
- 社区版:支持基本的 Python 语言开发。
- 专业版:支持更多的开发框架和技术栈,包括:
- Web 框架:如 Django、Flask、Pyramid。
- 数据科学工具:如 Jupyter、Matplotlib、Pandas 等。
- 更多的数据库支持:包括关系型数据库的查询和管理工具。
1.8. 编辑器与调试工具
- 社区版:提供基本的代码编辑、调试、版本控制支持。
- 专业版:提供更为强大的调试工具,包括对 多线程调试、Web 应用调试、数据库调试等的支持。
1.9. 集成工具
- 社区版:集成 Git 和 GitHub,支持基础的版本控制。
- 专业版:集成了更多的版本控制系统,如 Git、Mercurial、Subversion(SVN),并且支持更多的工具集成(例如 Docker 和 Kubernetes 等)。
1.10.总结
- 社区版适合学习、基础的 Python 开发、简单的项目和个人开发者。它涵盖了 Python 开发的基础功能,且免费。
- 专业版适合需要更强大功能的专业开发者和团队,特别是涉及 Web 开发、数据科学、数据库和远程开发等领域。它提供了更全面的功能,但需要付费。
如果你只是学习 Python 或者进行简单的项目开发,社区版完全足够。而如果你从事 Web 开发、数据科学或复杂的企业级开发,或者需要与数据库进行交互,专业版将为你提供更多的工具和支持。
2.下载PyCharm
官网:https://www.jetbrains.com/zh-cn/pycharm/
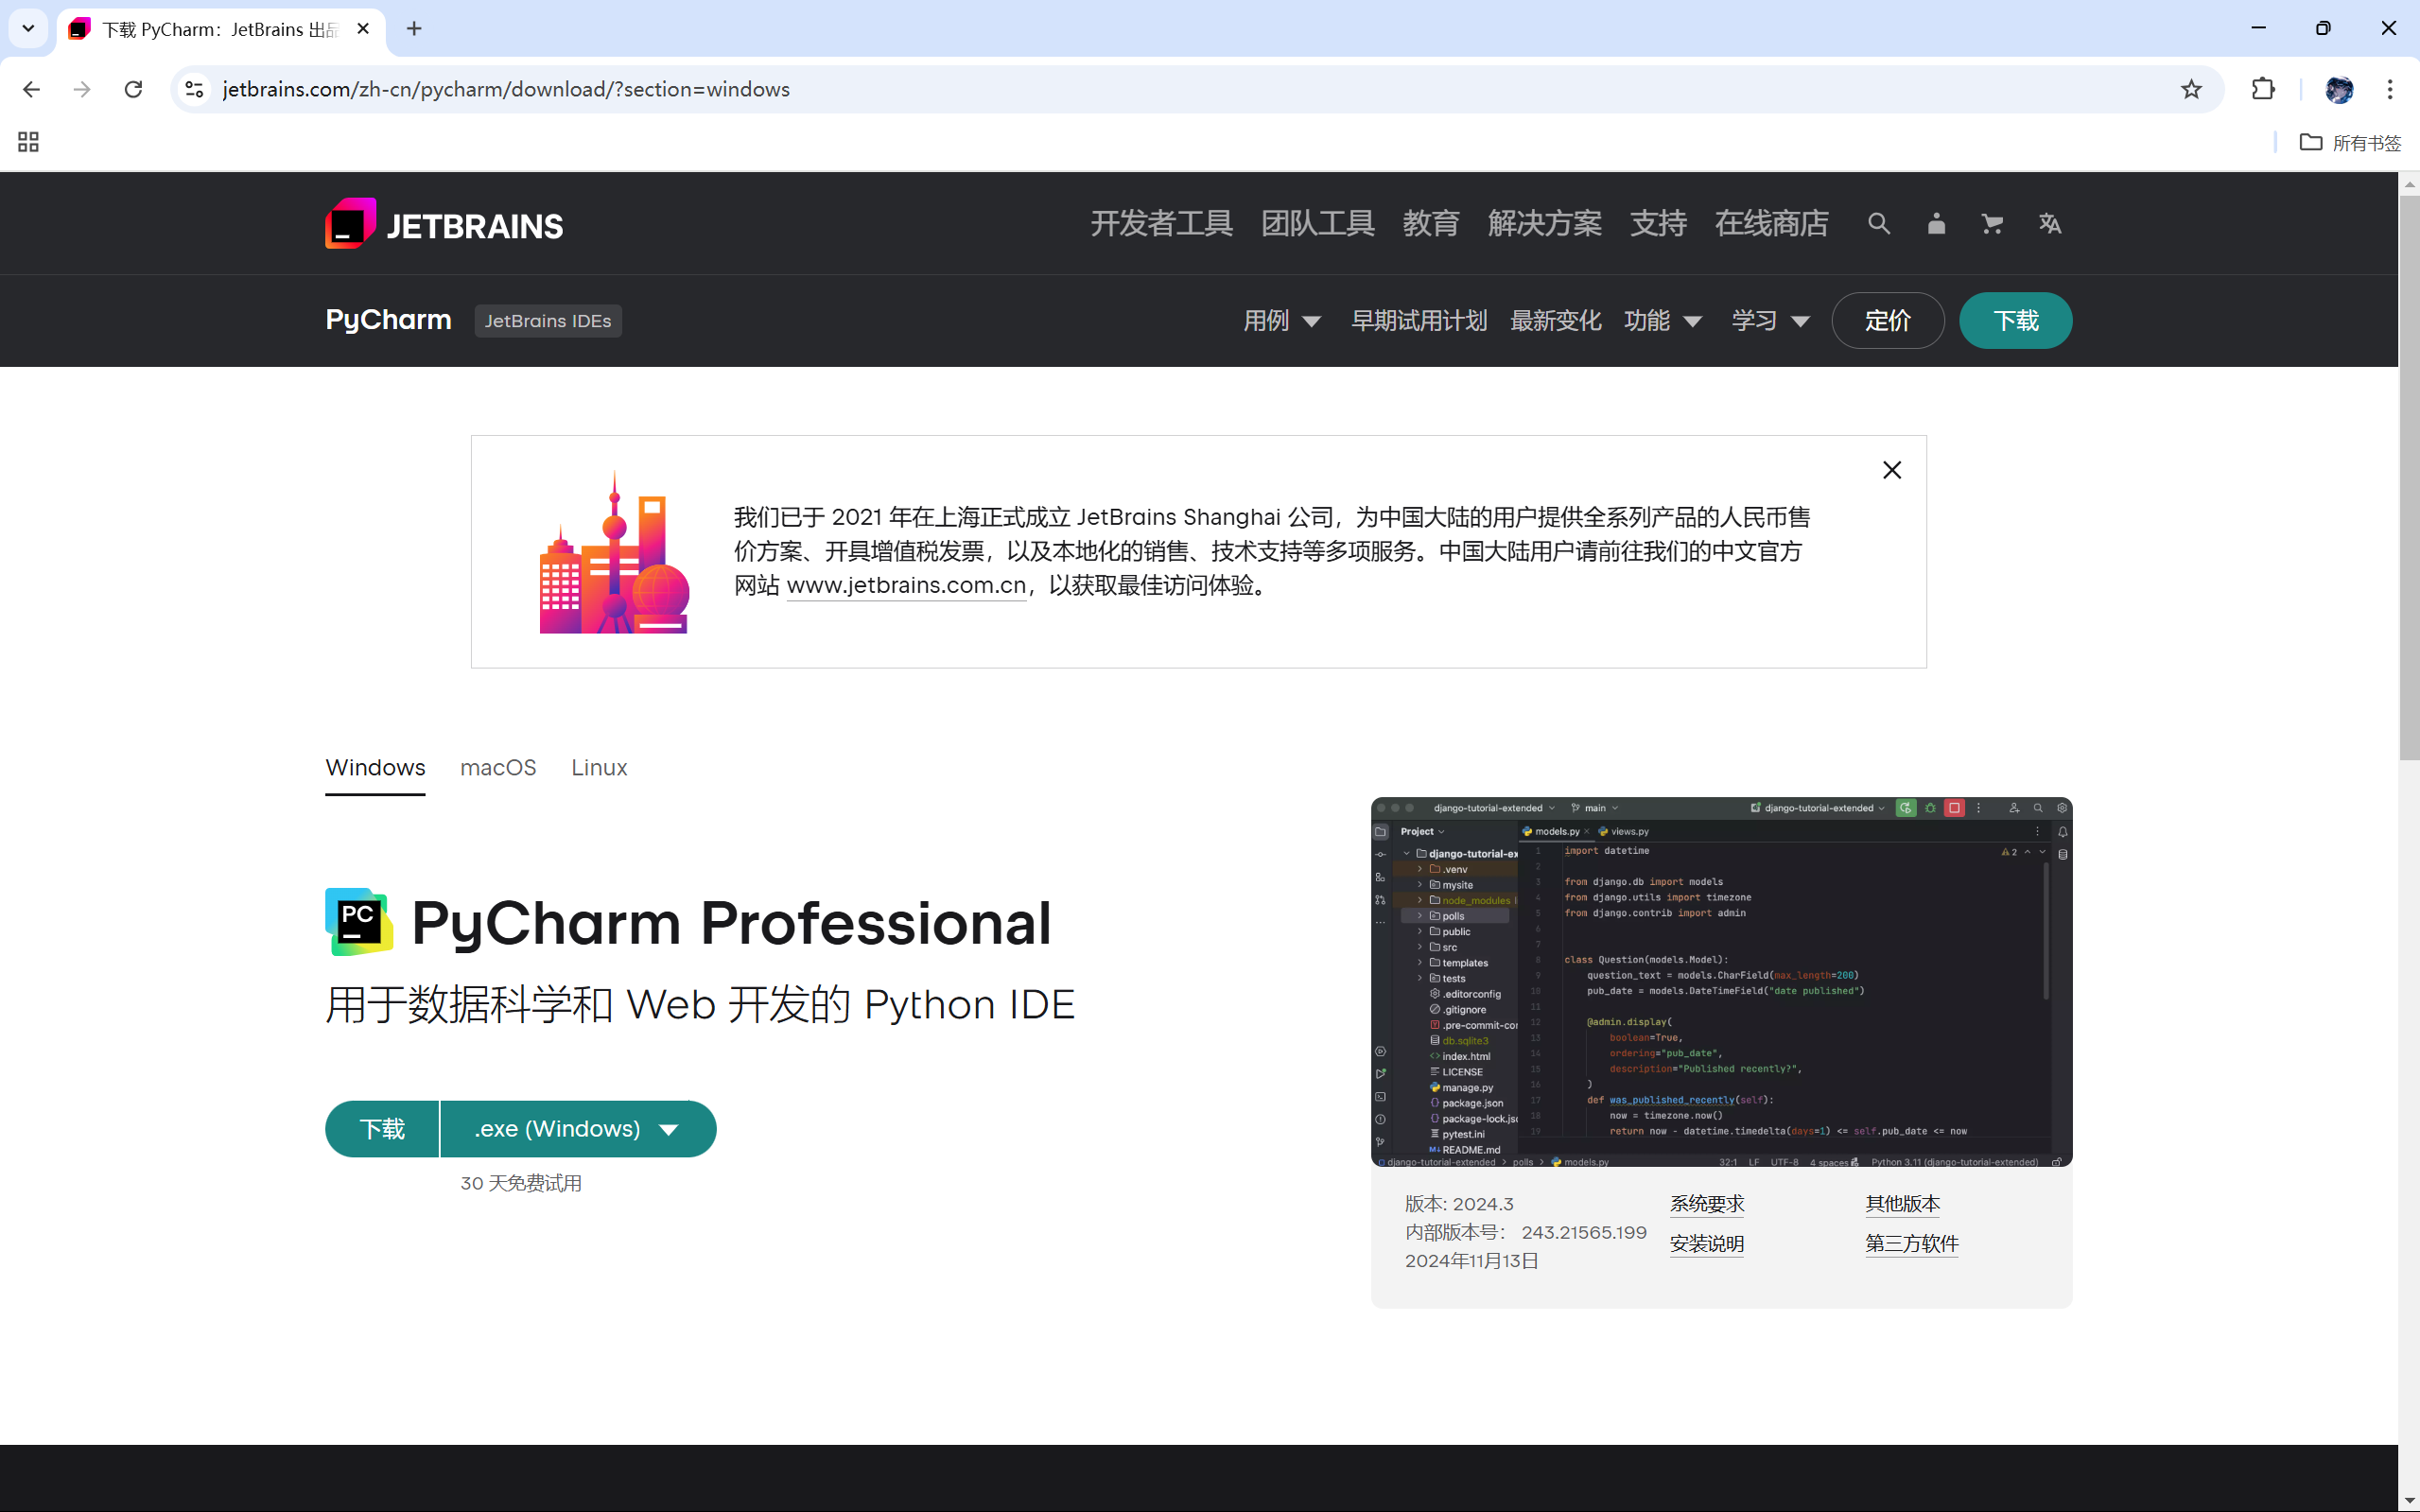
1.点击下载
 这个是专业版,需要付费
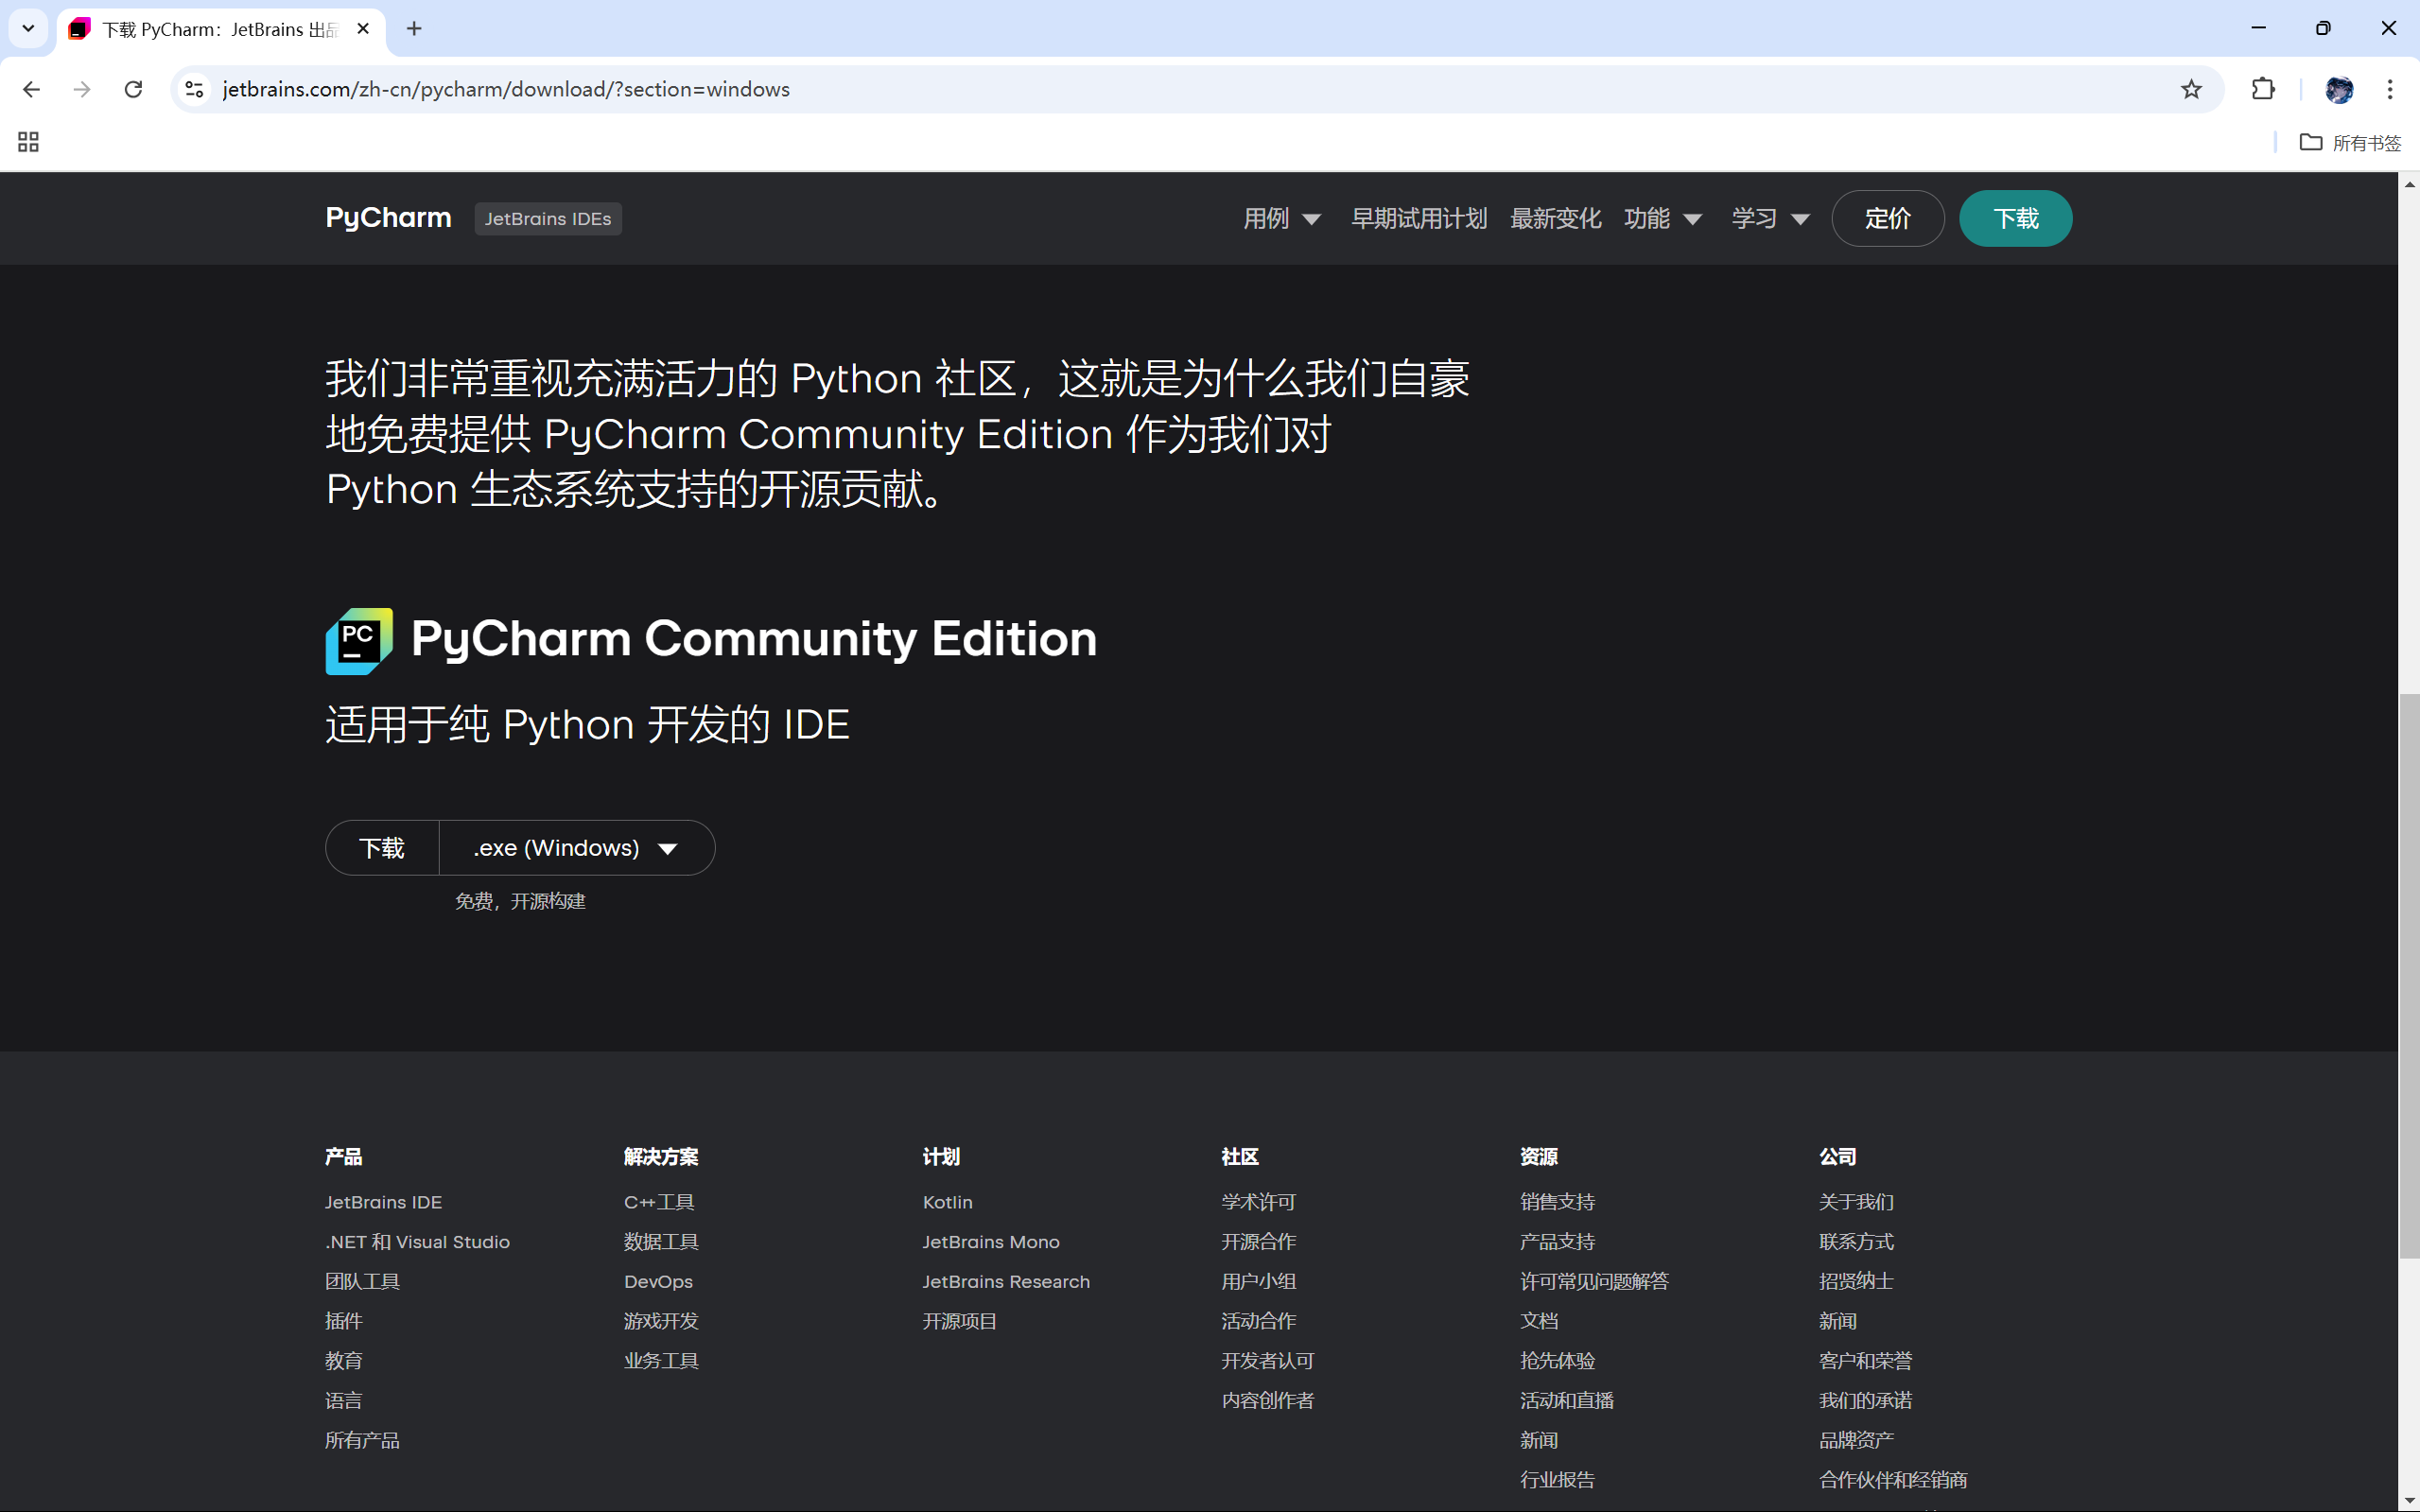
 下滑可以看到免费的社区版
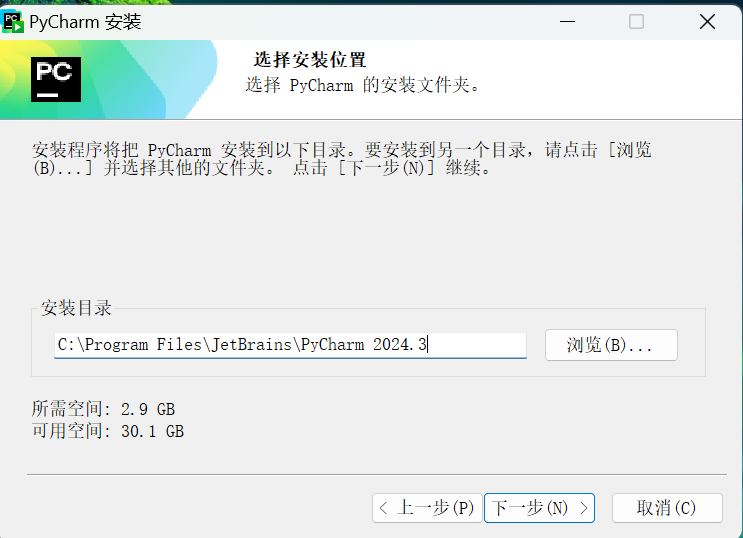
 1.选择下载哪个版本,下载后打开安装包(这里是专业版)
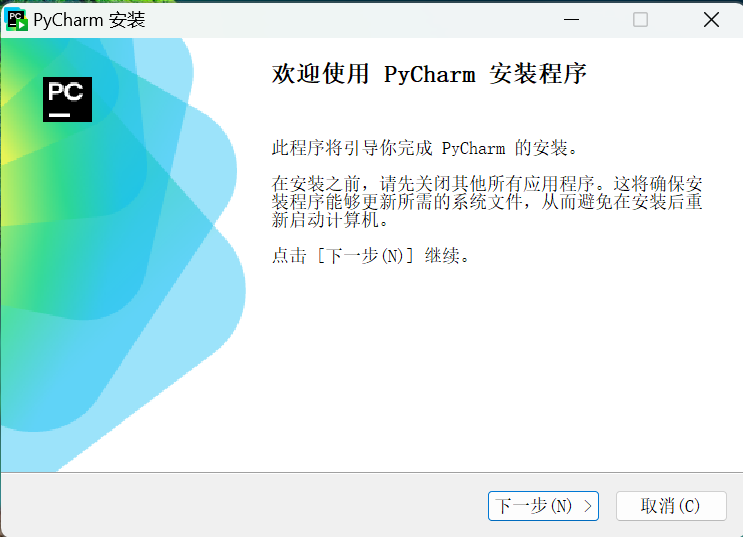 2.可以自定义安装路径
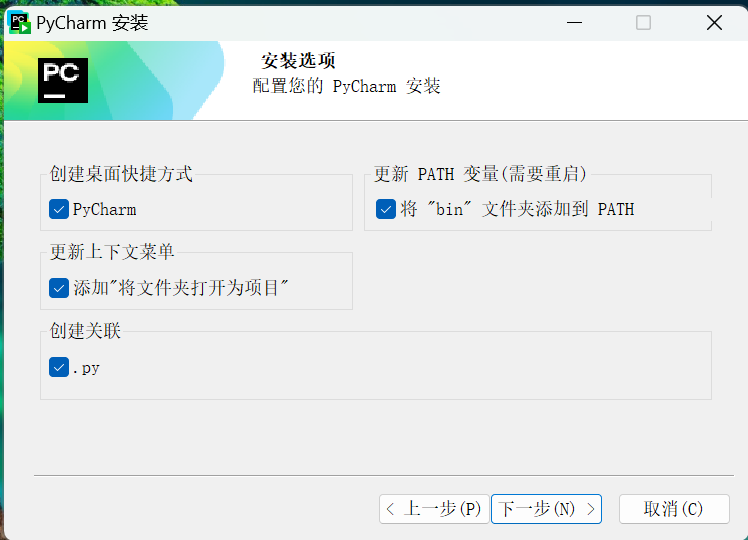
 3.推荐将这四个都勾选
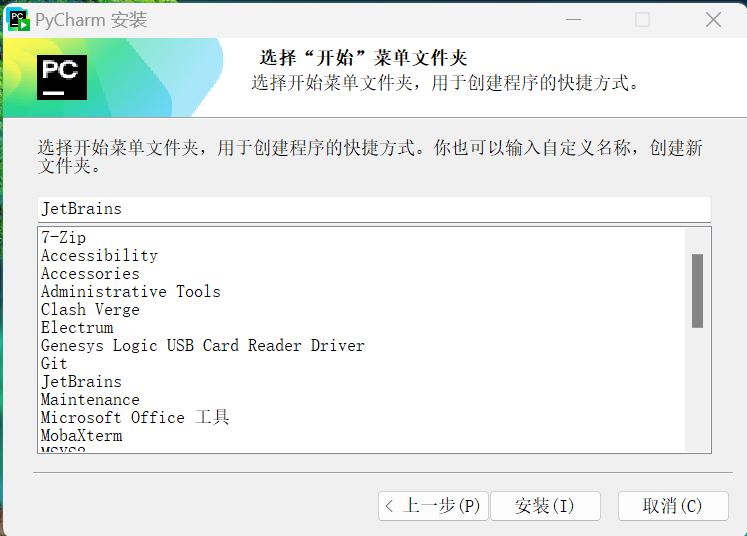
 4.可选择将快捷方式安装在哪,然后安装
3.激活专业版
如果选择使用社区版,可以跳过
关于激活原理,仅给出自己的理解作为参考:
这个过程通过修改 PyCharm 的启动参数,使用 Java 代理(ja-netfilter.jar)绕过激活检查,同时提供了一种手动或自动配置方式来完成激活。通过使用指定的激活密钥和更改 Java 环境的访问权限,这种方法可以让用户在没有正式许可证的情况下继续使用软件。
1.进入网址:https://3.jetbra.in/
2.随便选择一个可用的网站进入
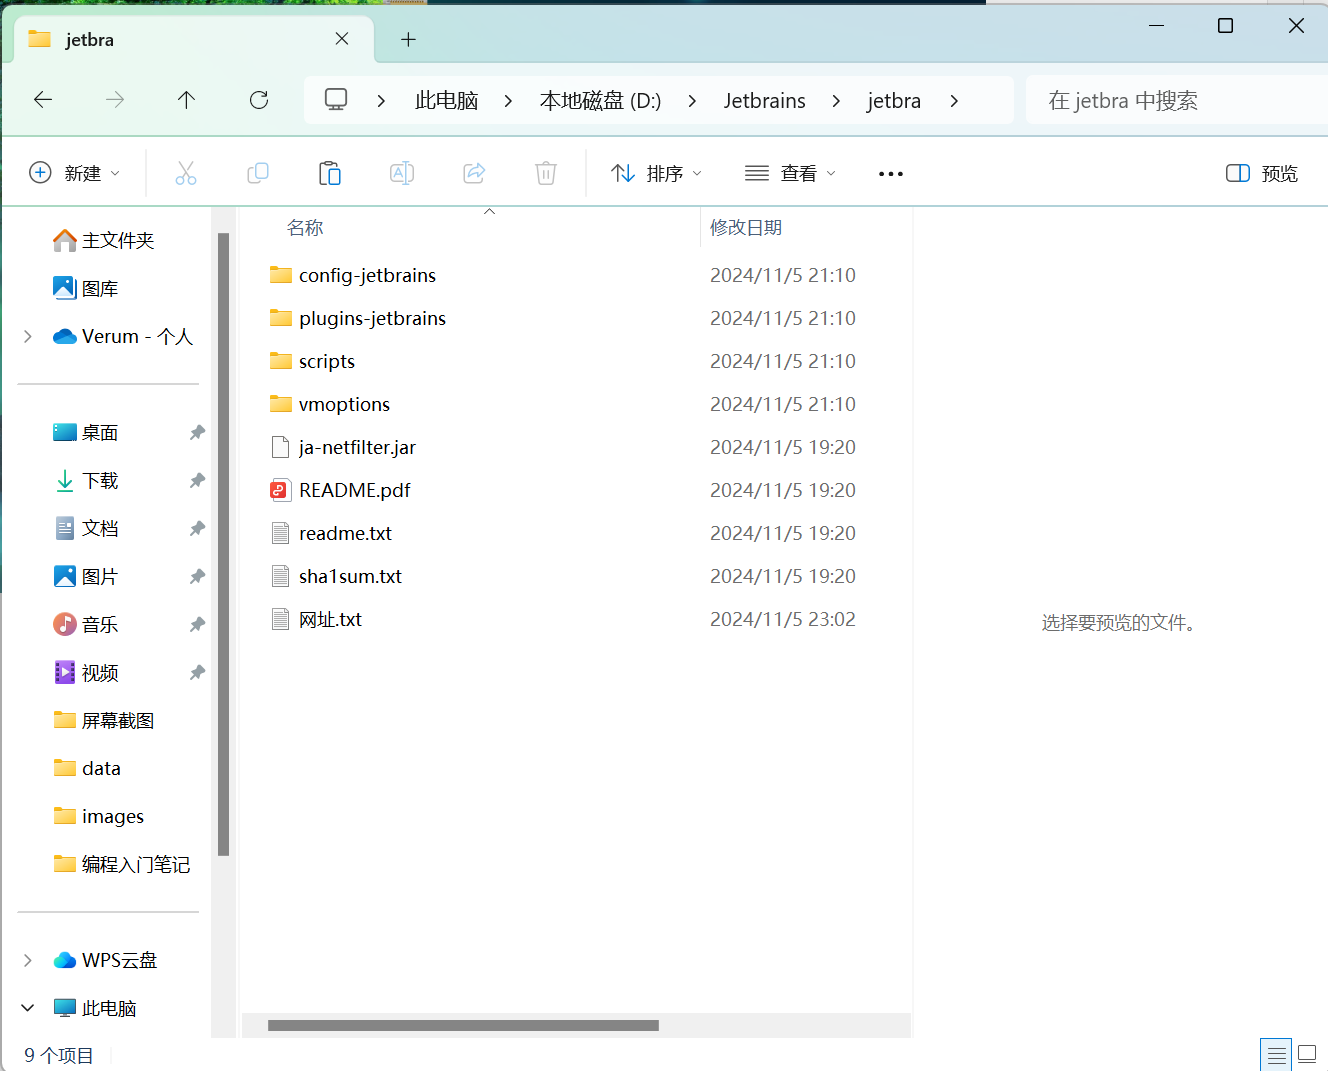
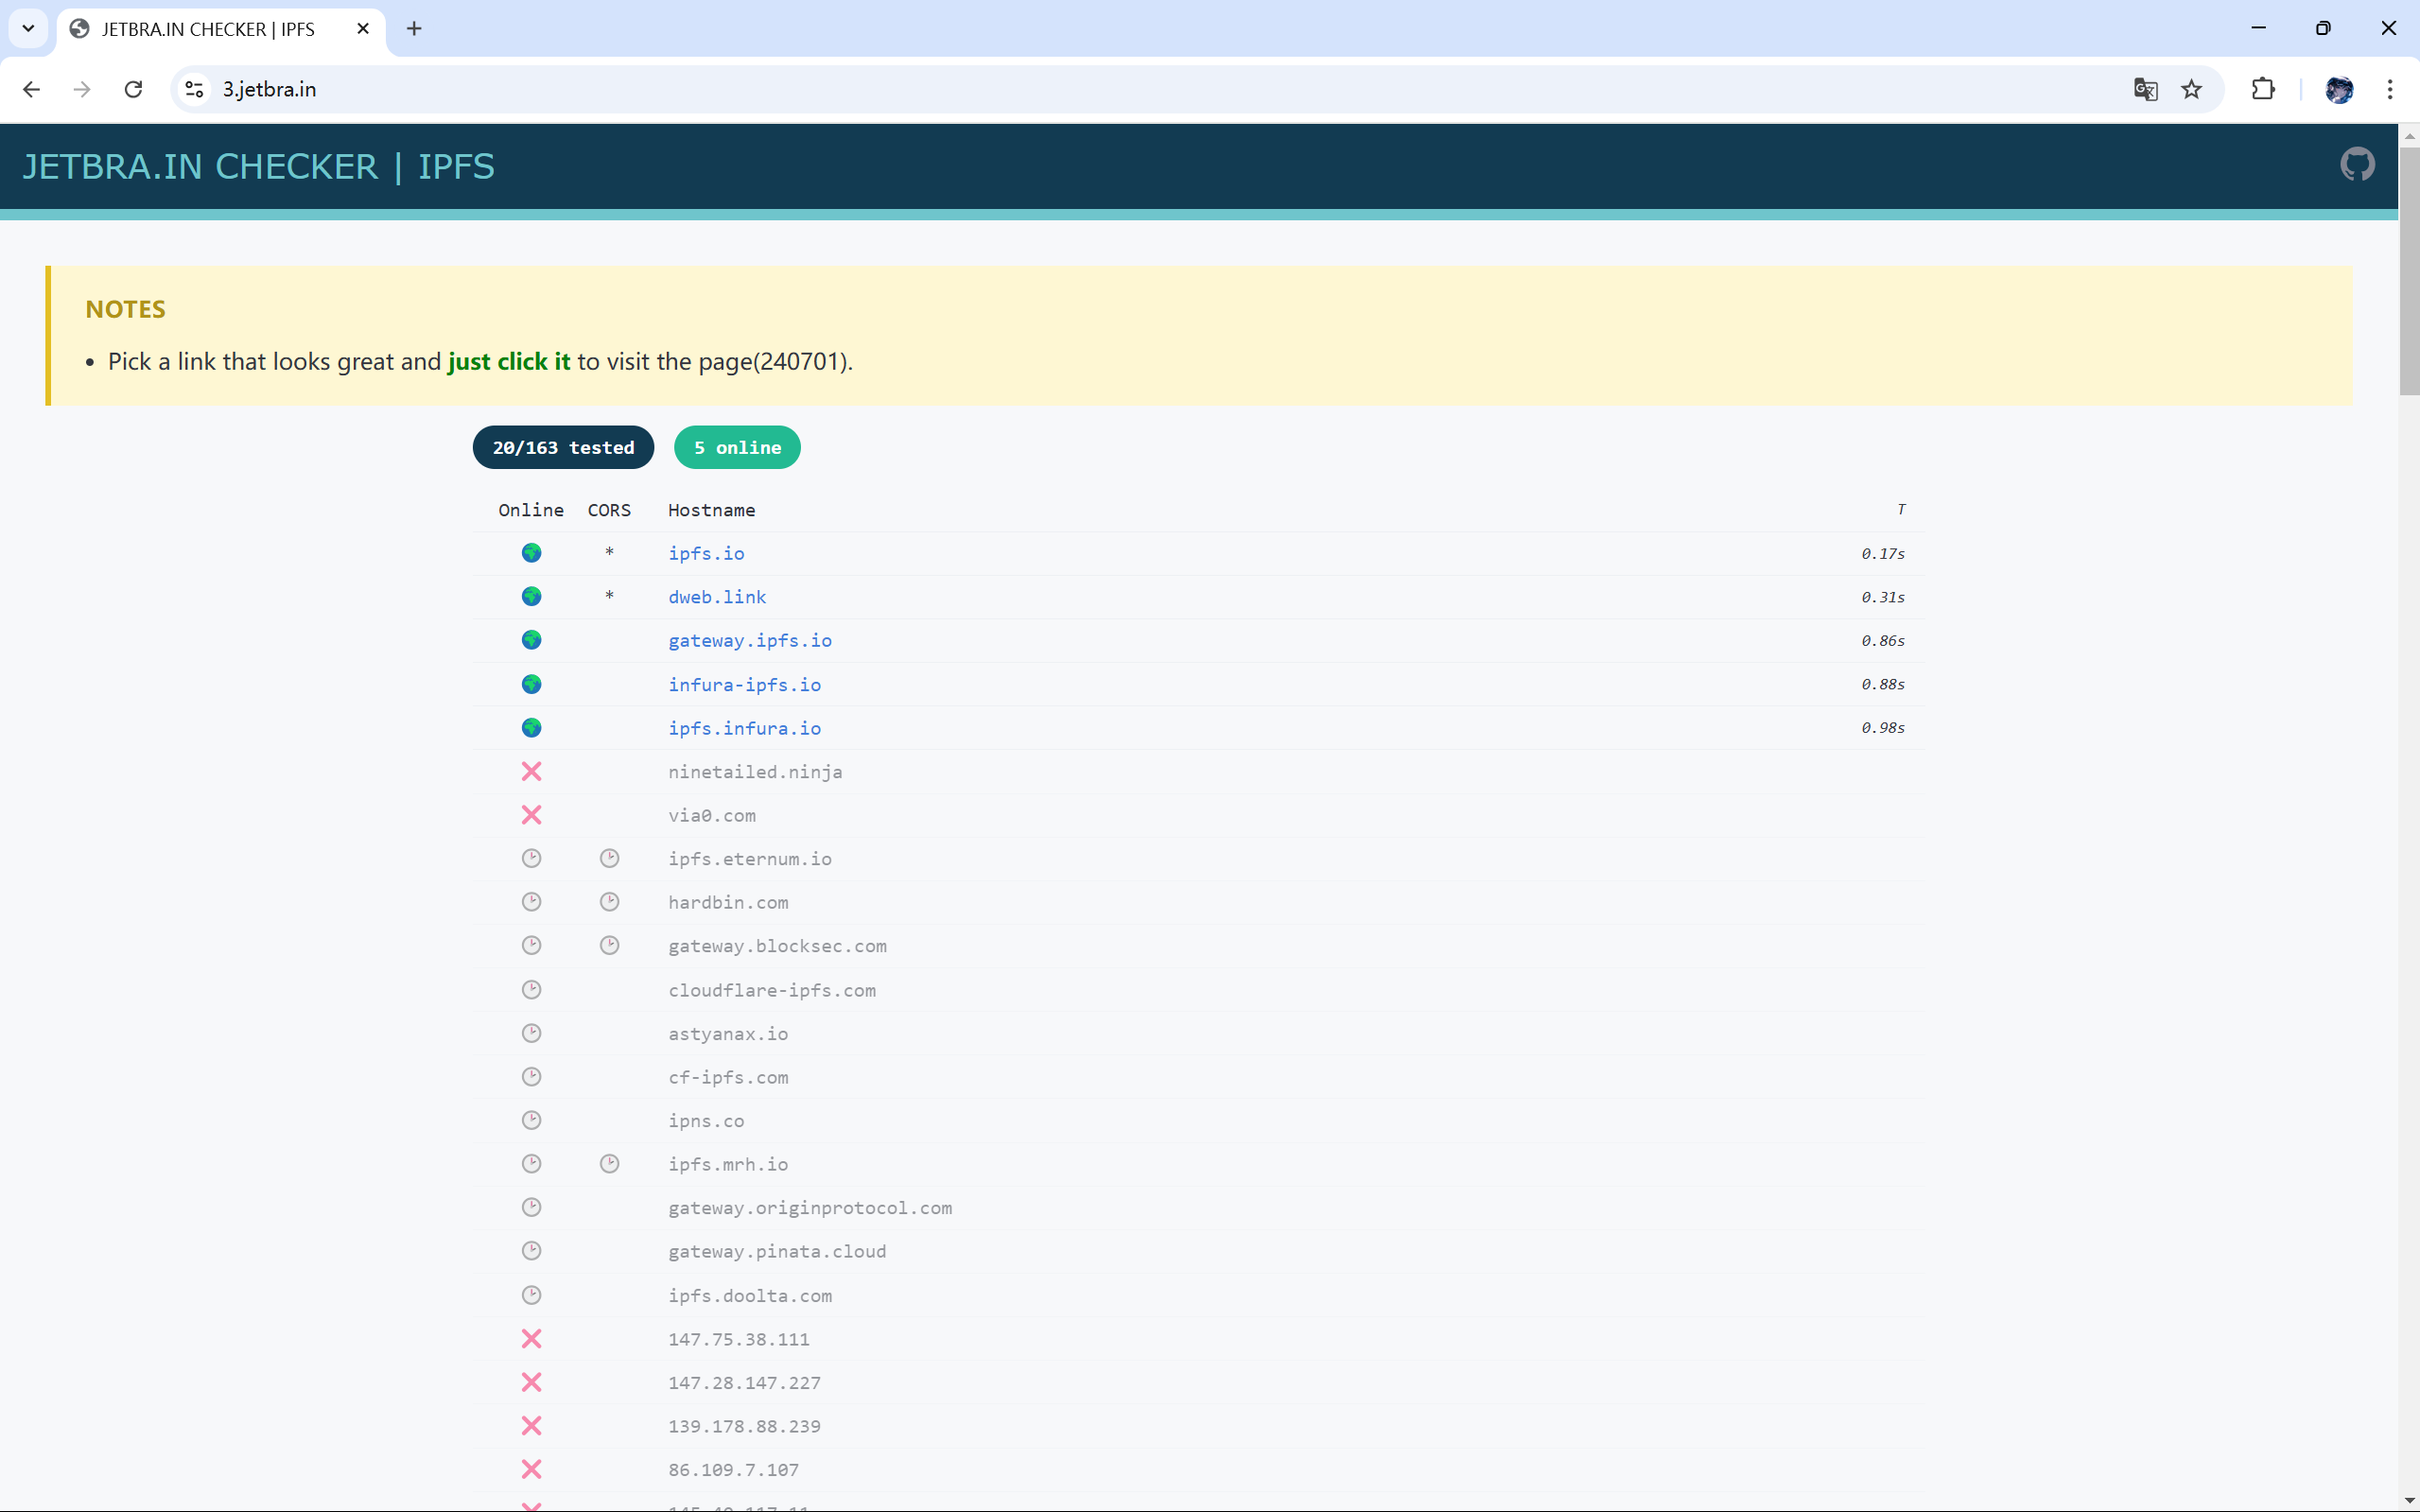 3.下载这个文件并解压缩
 4.打开解压后的文件
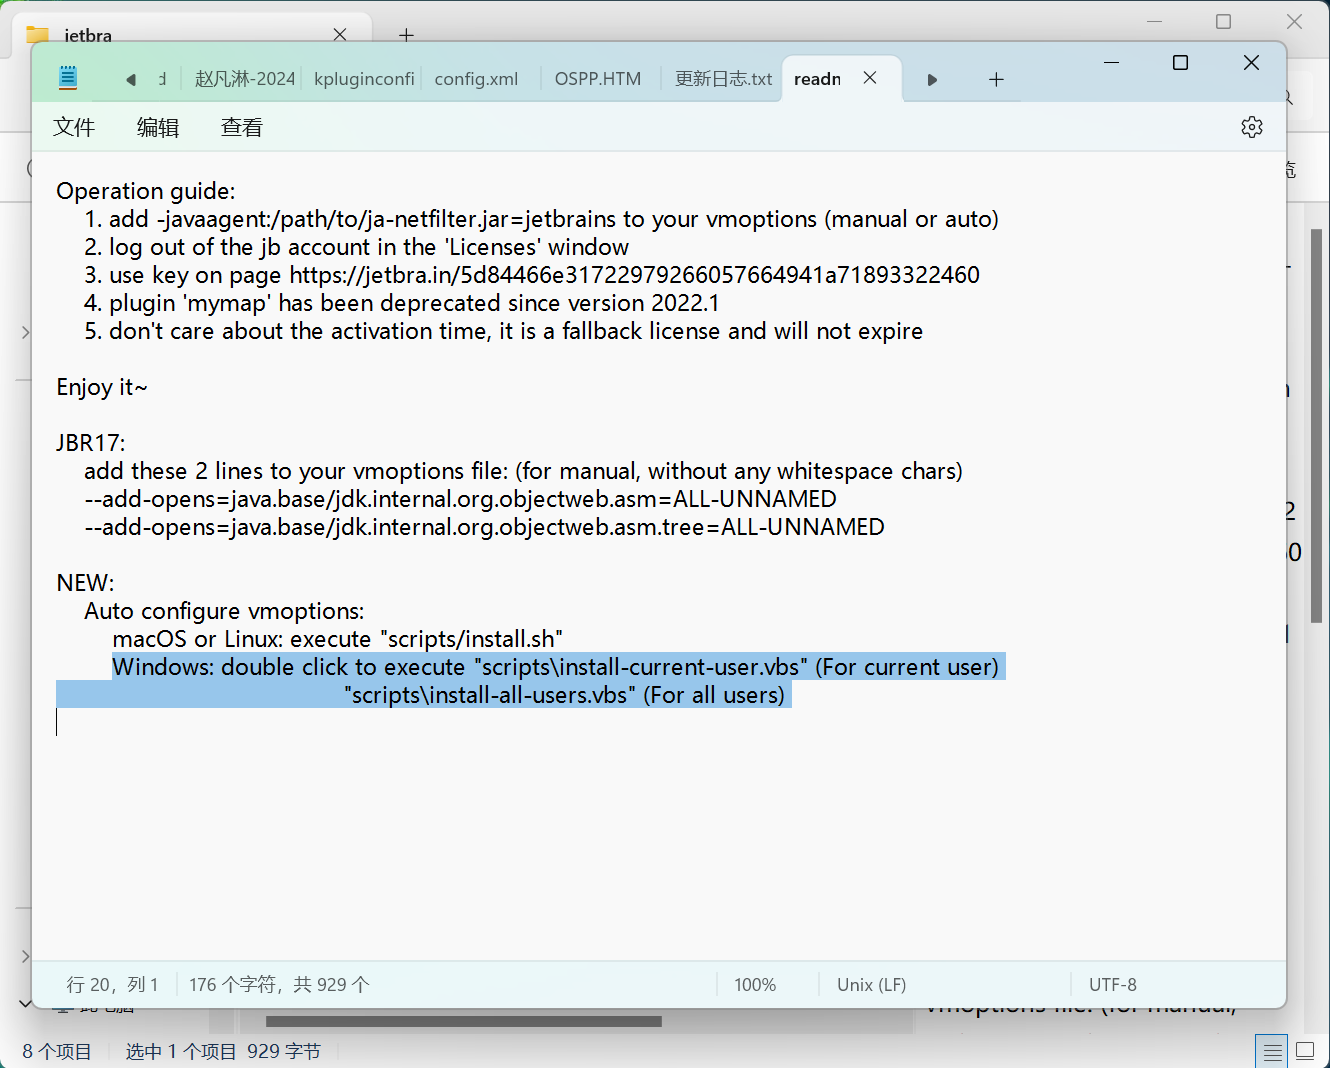
 5.关于如何激活,我们可以看看作者给出的方法,打开readme.txt
 这里激活的核心是绕过软件的许可证验证
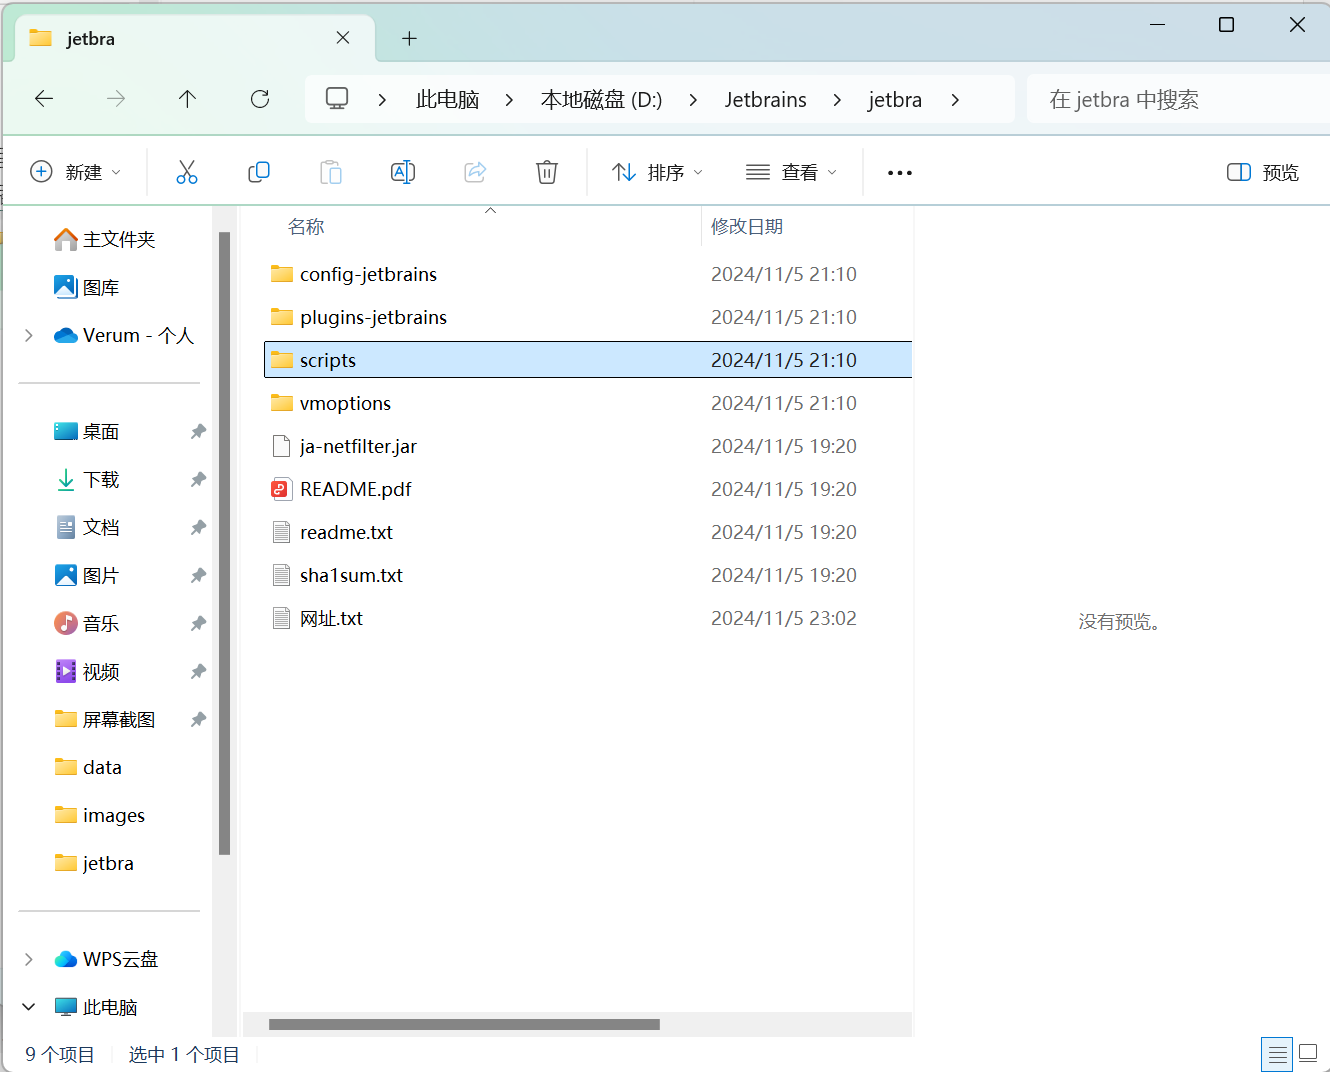
作者给出了一个自动完成配置的脚本
 6.打开scripts(脚本)
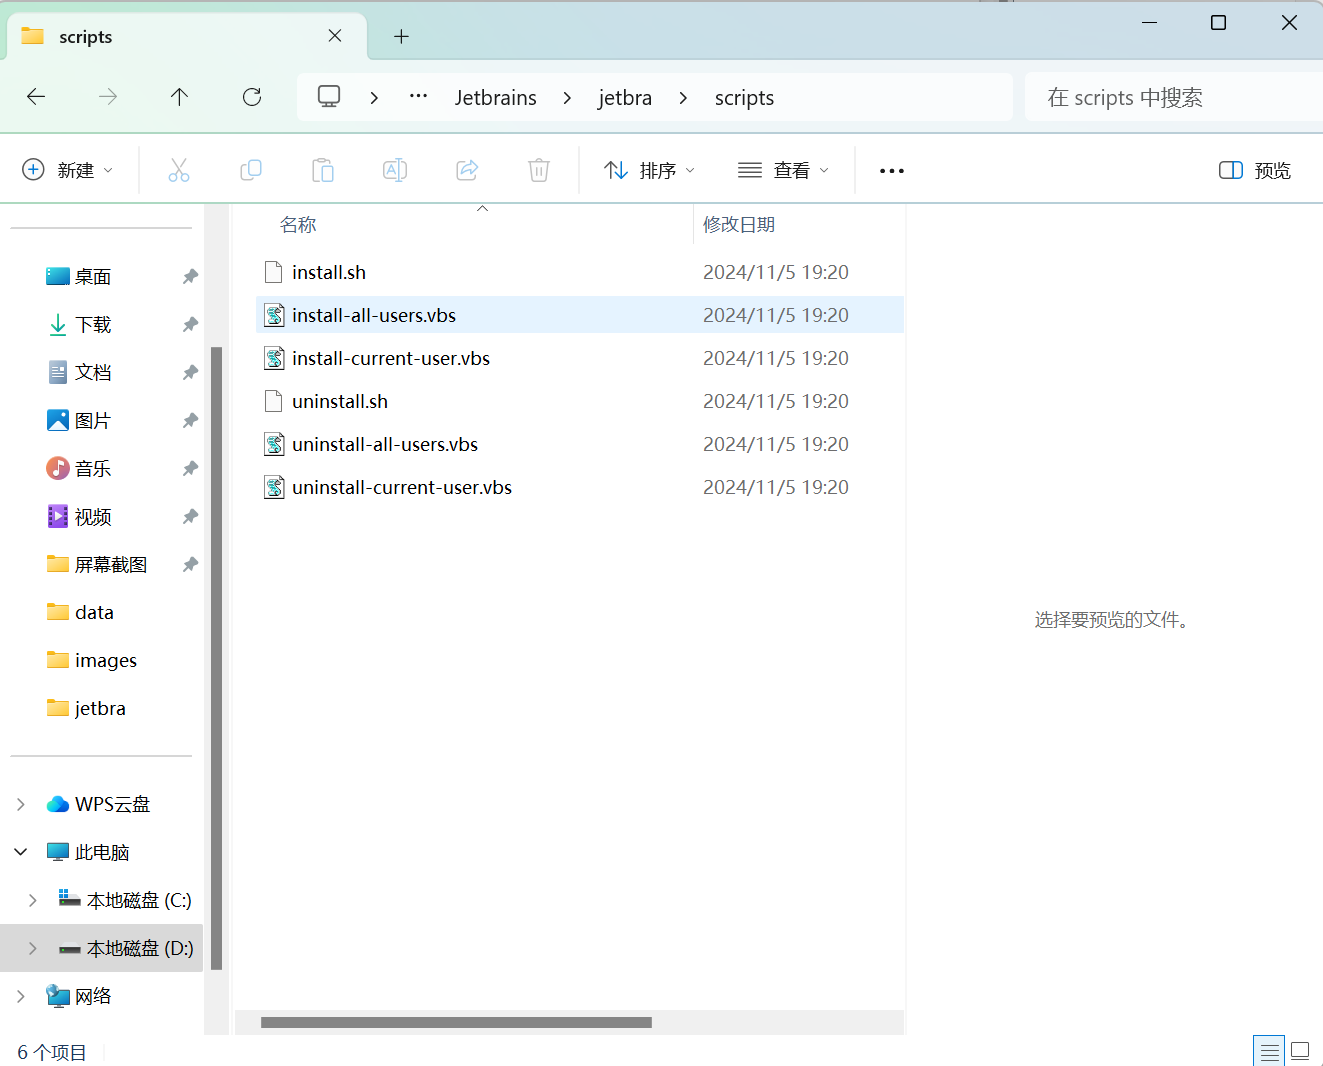
 7.运行安装到所有用户的脚本,安装到当前用户的脚本也可以
注释:
VMOptions 文件(通常称为 vmoptions 文件)是一个配置文件,它包含用于定制和配置 JVM(Java 虚拟机)运行时行为的启动参数。它允许用户调整 JVM 的内存使用、性能优化、调试设置、代理配置等。
JetBrains 产品(如 PyCharm)是基于 Java 的,因此它们也使用 JVM。通过编辑 vmoptions 文件,用户可以修改这些参数来优化应用程序的运行,例如设置内存大小、启用代理等。
该脚本通过修改 JetBrains 产品(如 PyCharm、IntelliJ IDEA 等)的 vmoptions 文件,注入 ja-netfilter.jar Java 代理,通常用于绕过授权验证或进行其他定制操作。它首先确保以管理员权限运行,删除旧的配置,然后将新的代理配置应用到目标产品的环境变量中,最终在启动时加载代理文件。
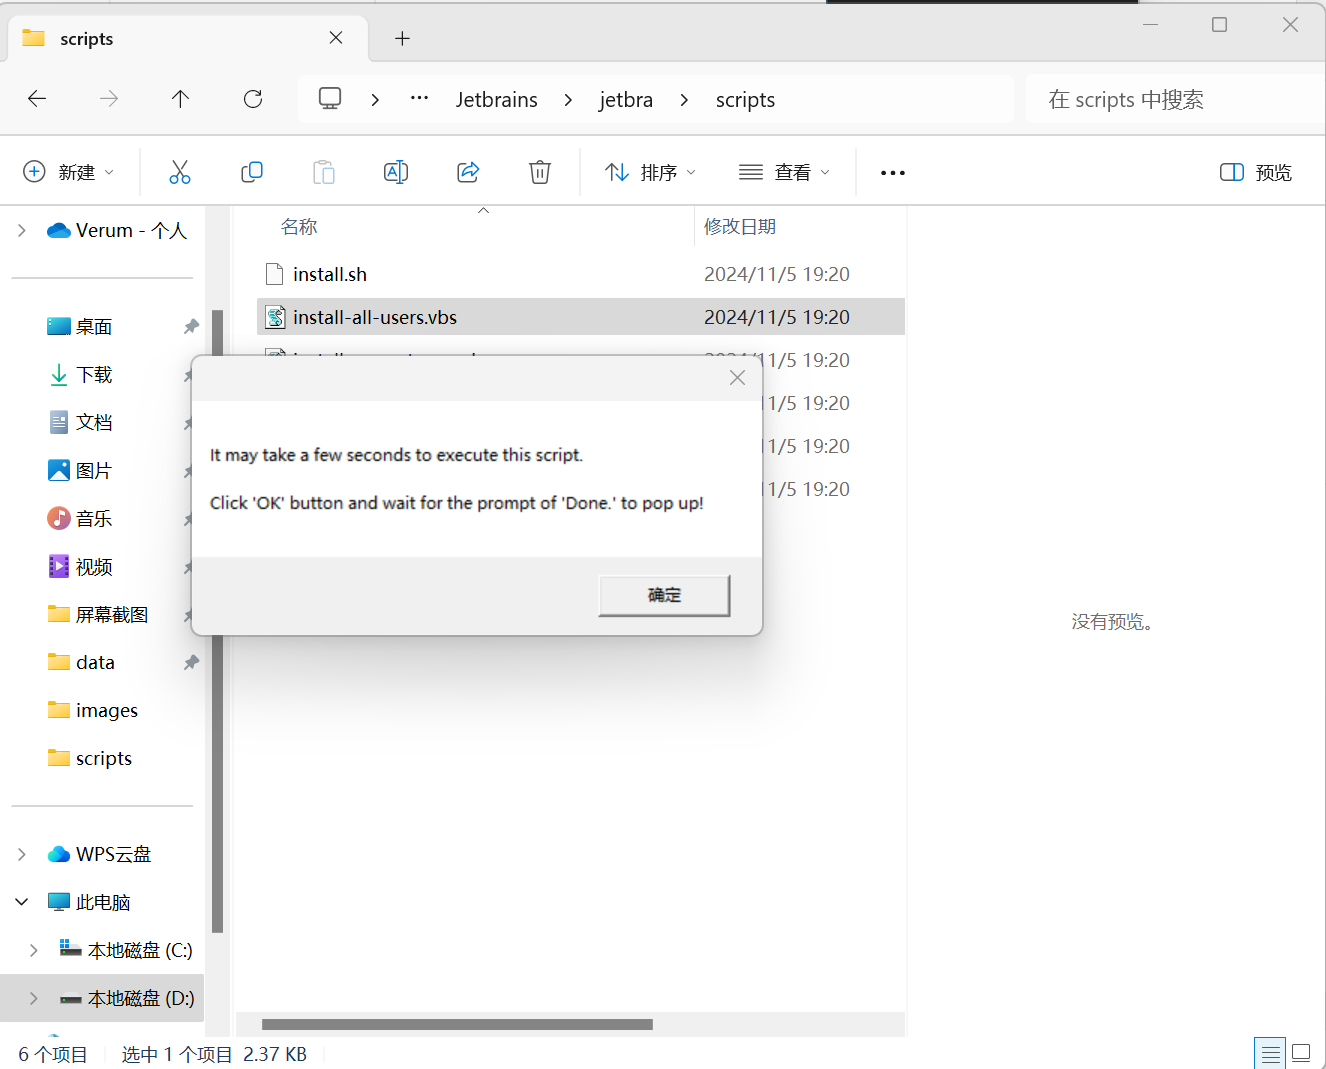 8.等待完成
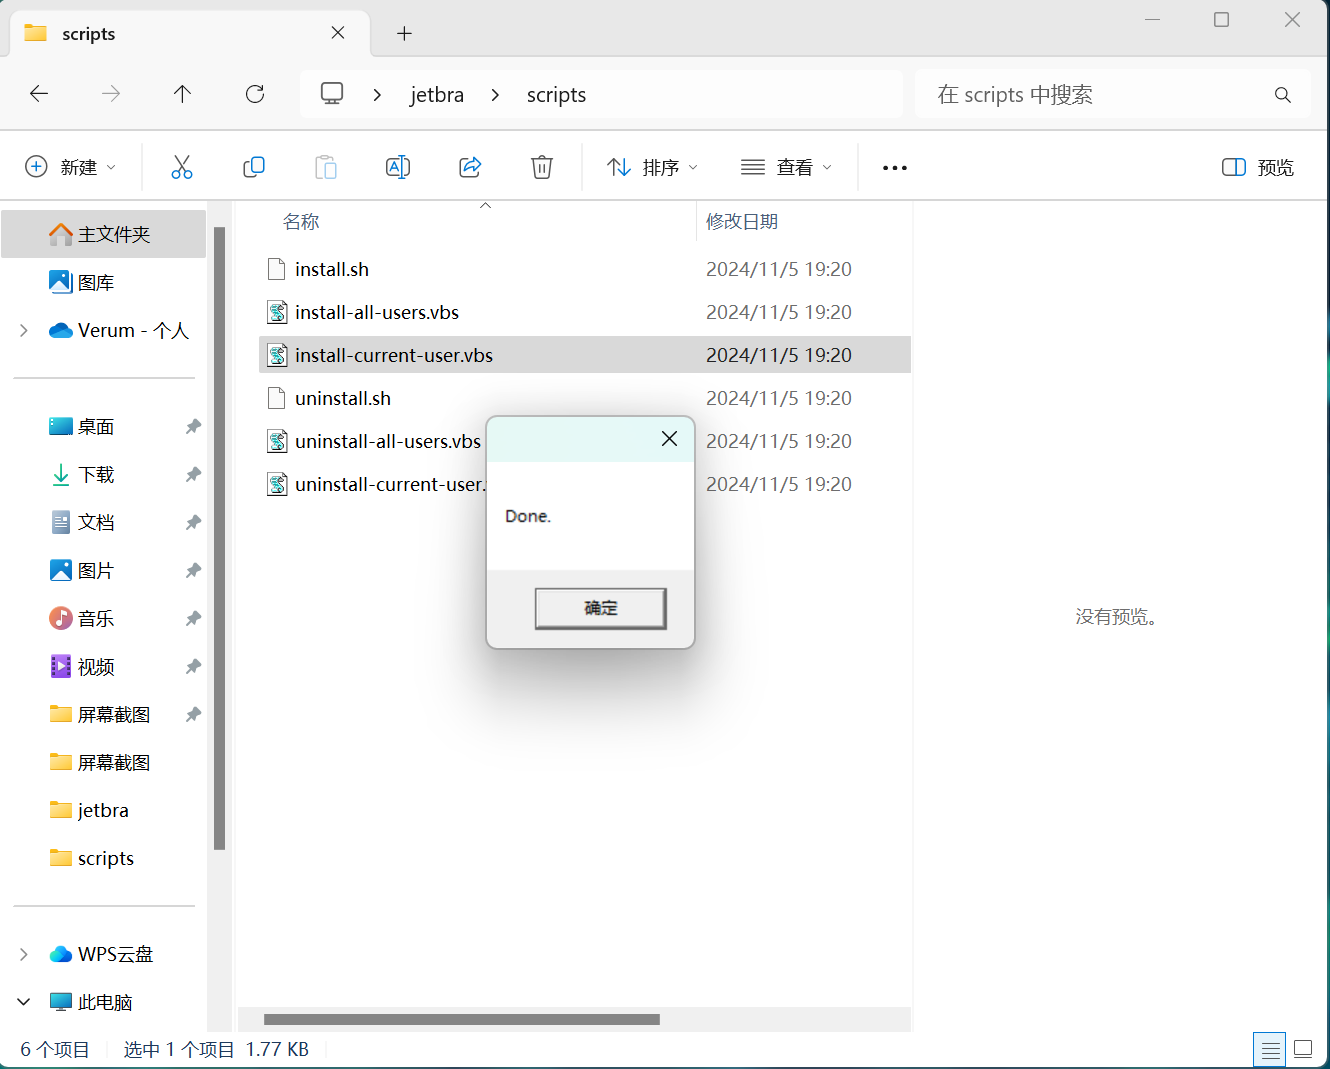 9.回到之前的网站,找到PyCharm,复制激活码
 10.运行安装好的PyCharm
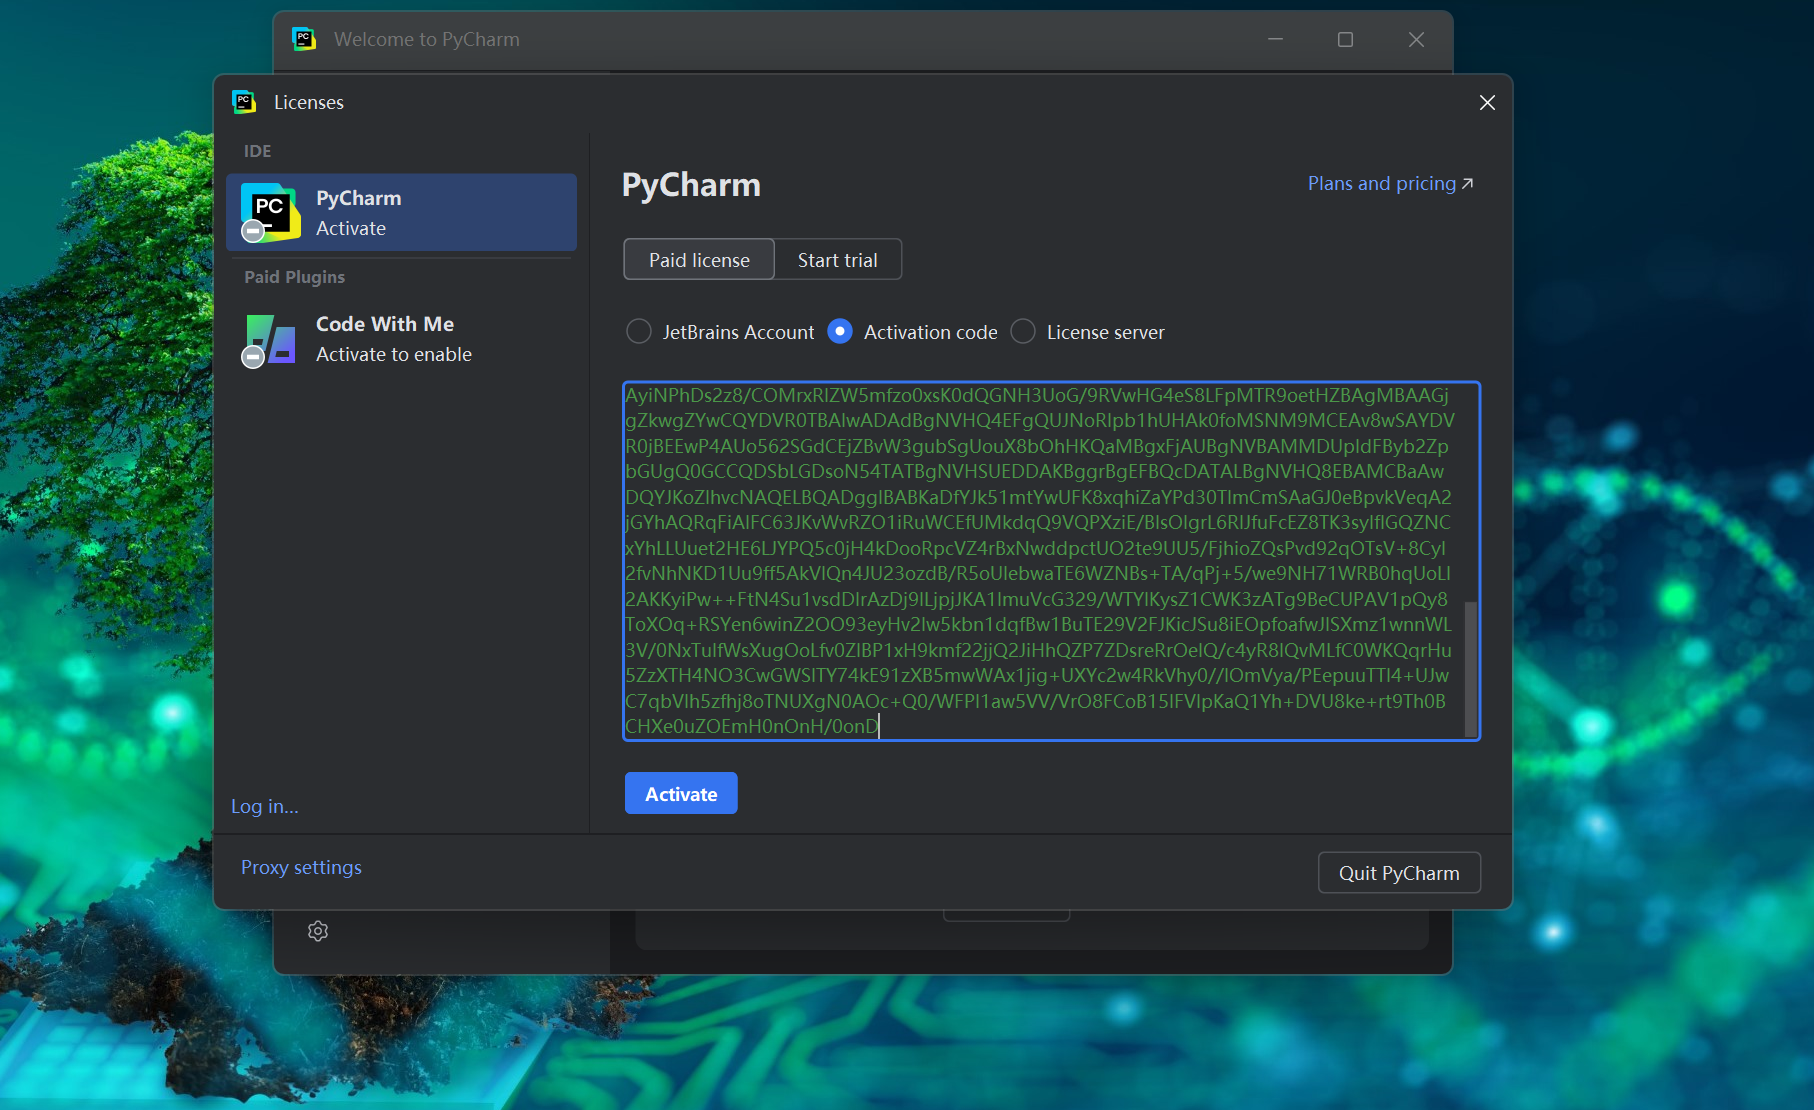
11.激活许可证的三个选项中选择激活码,然后将激活码粘贴进去,点击激活
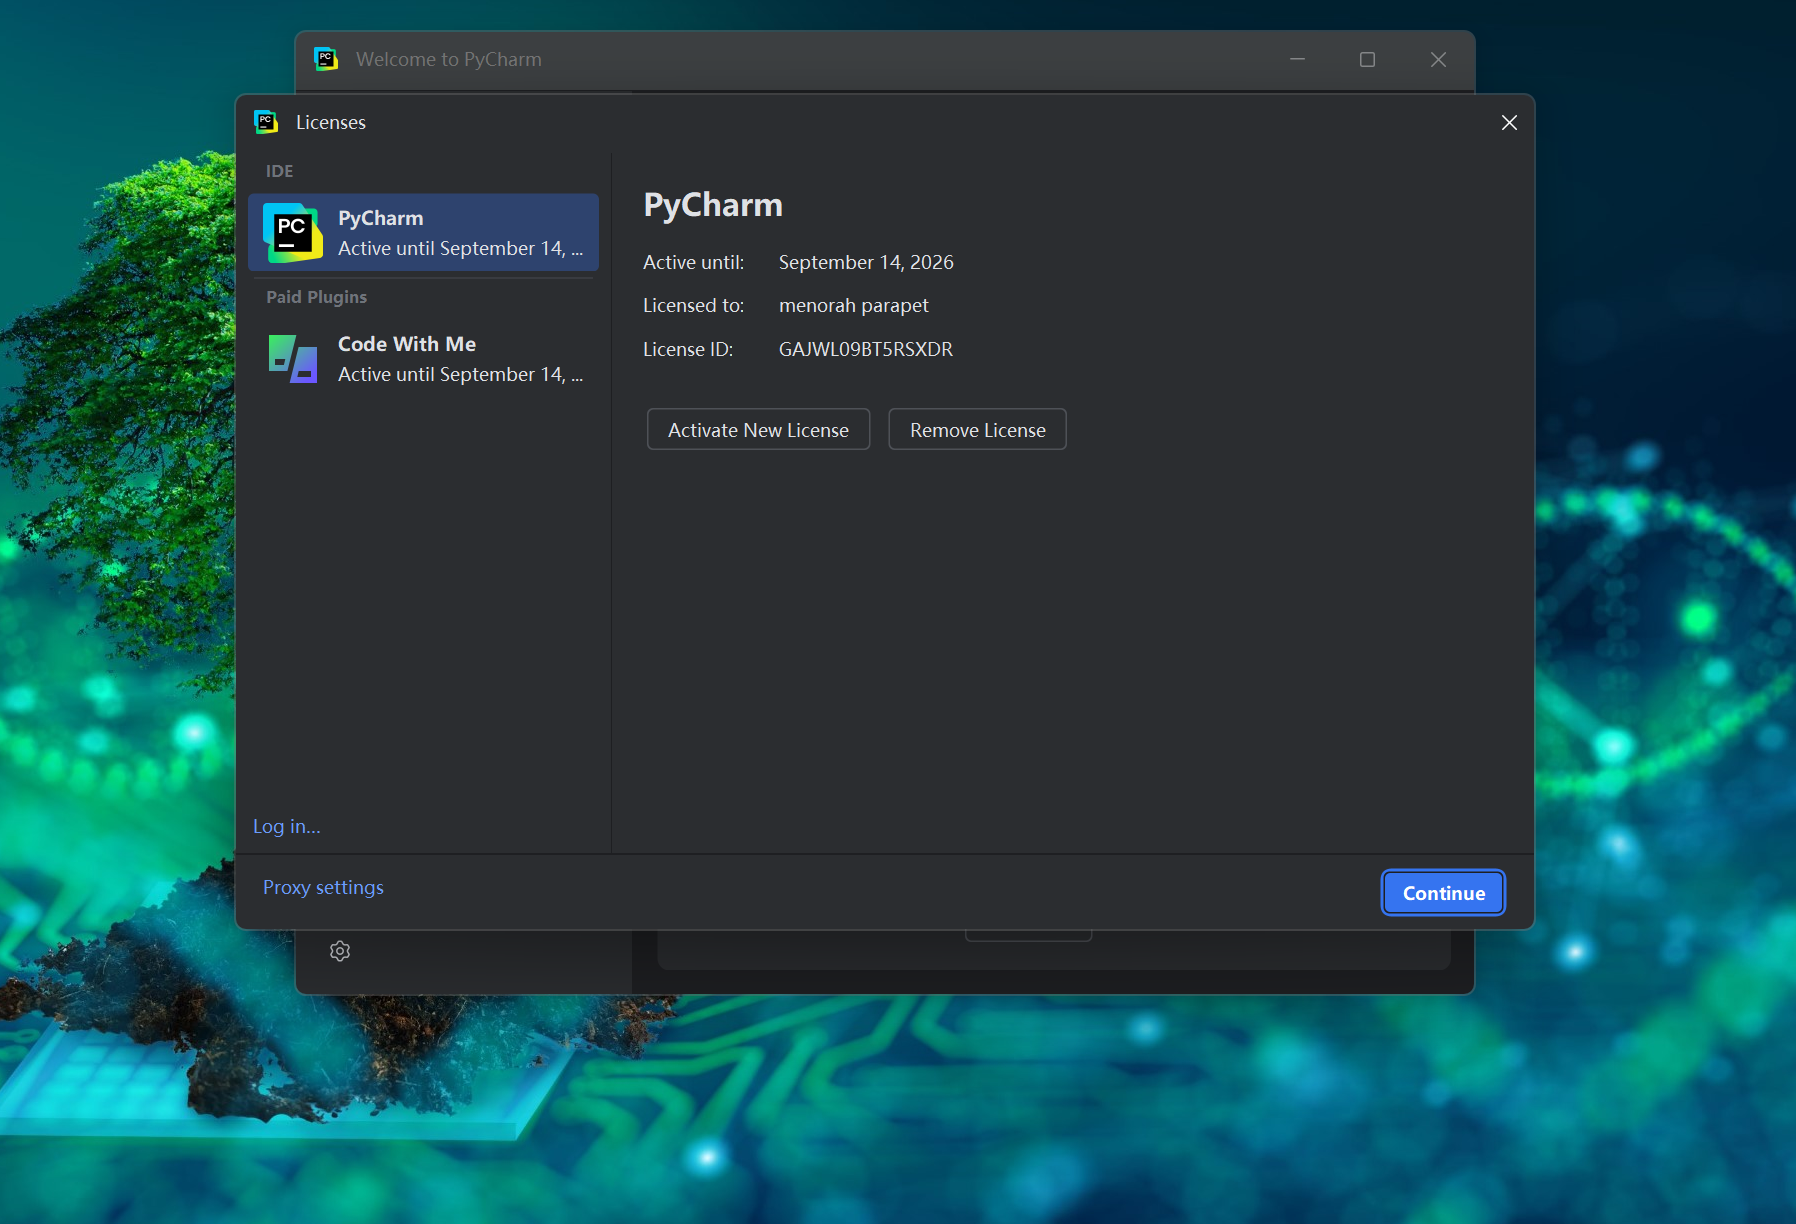
 12.可以看到激活完成
可以看到有效期是到2026年9月14日,根据作者的说法,到了有效期后仍可一直使用
到时若不能继续使用,我再回来更新其它方法
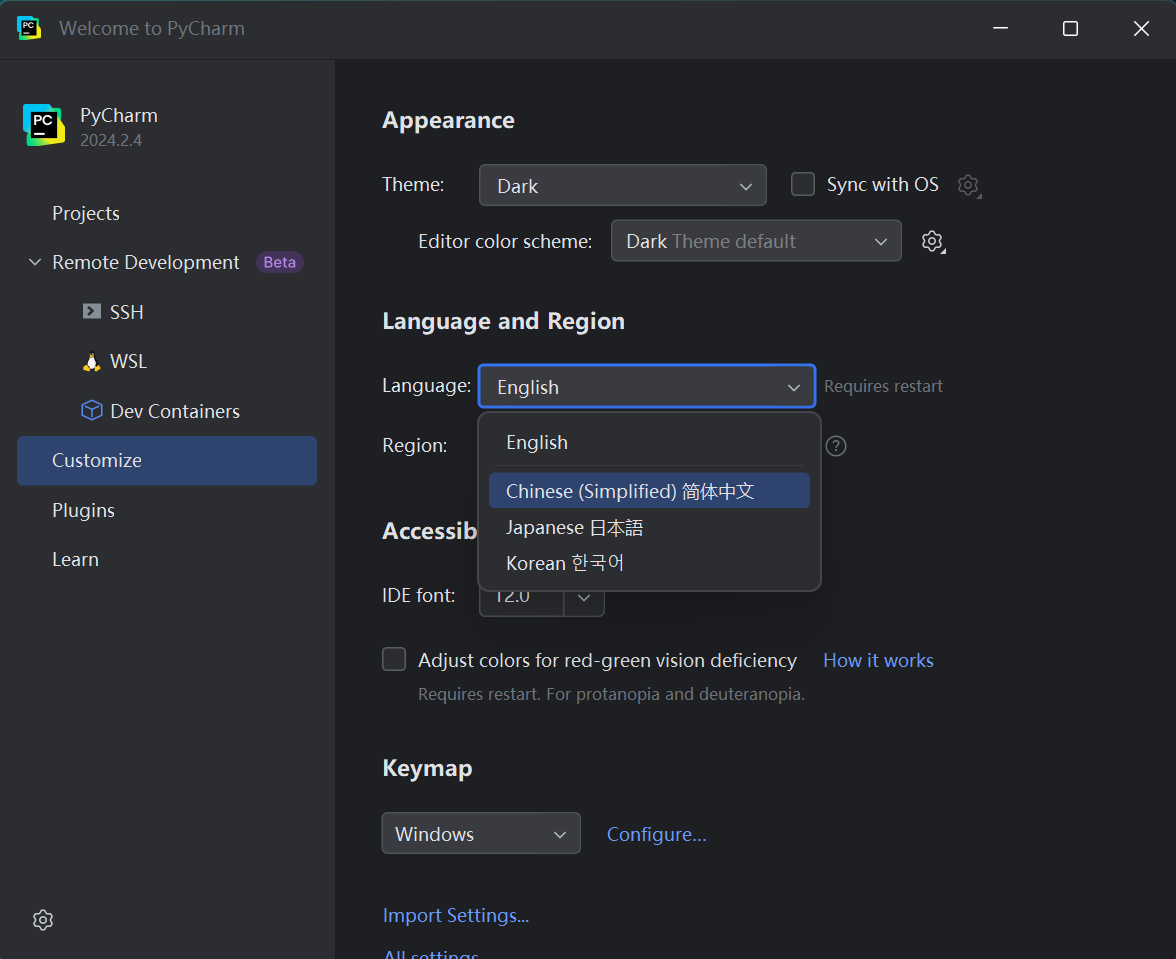
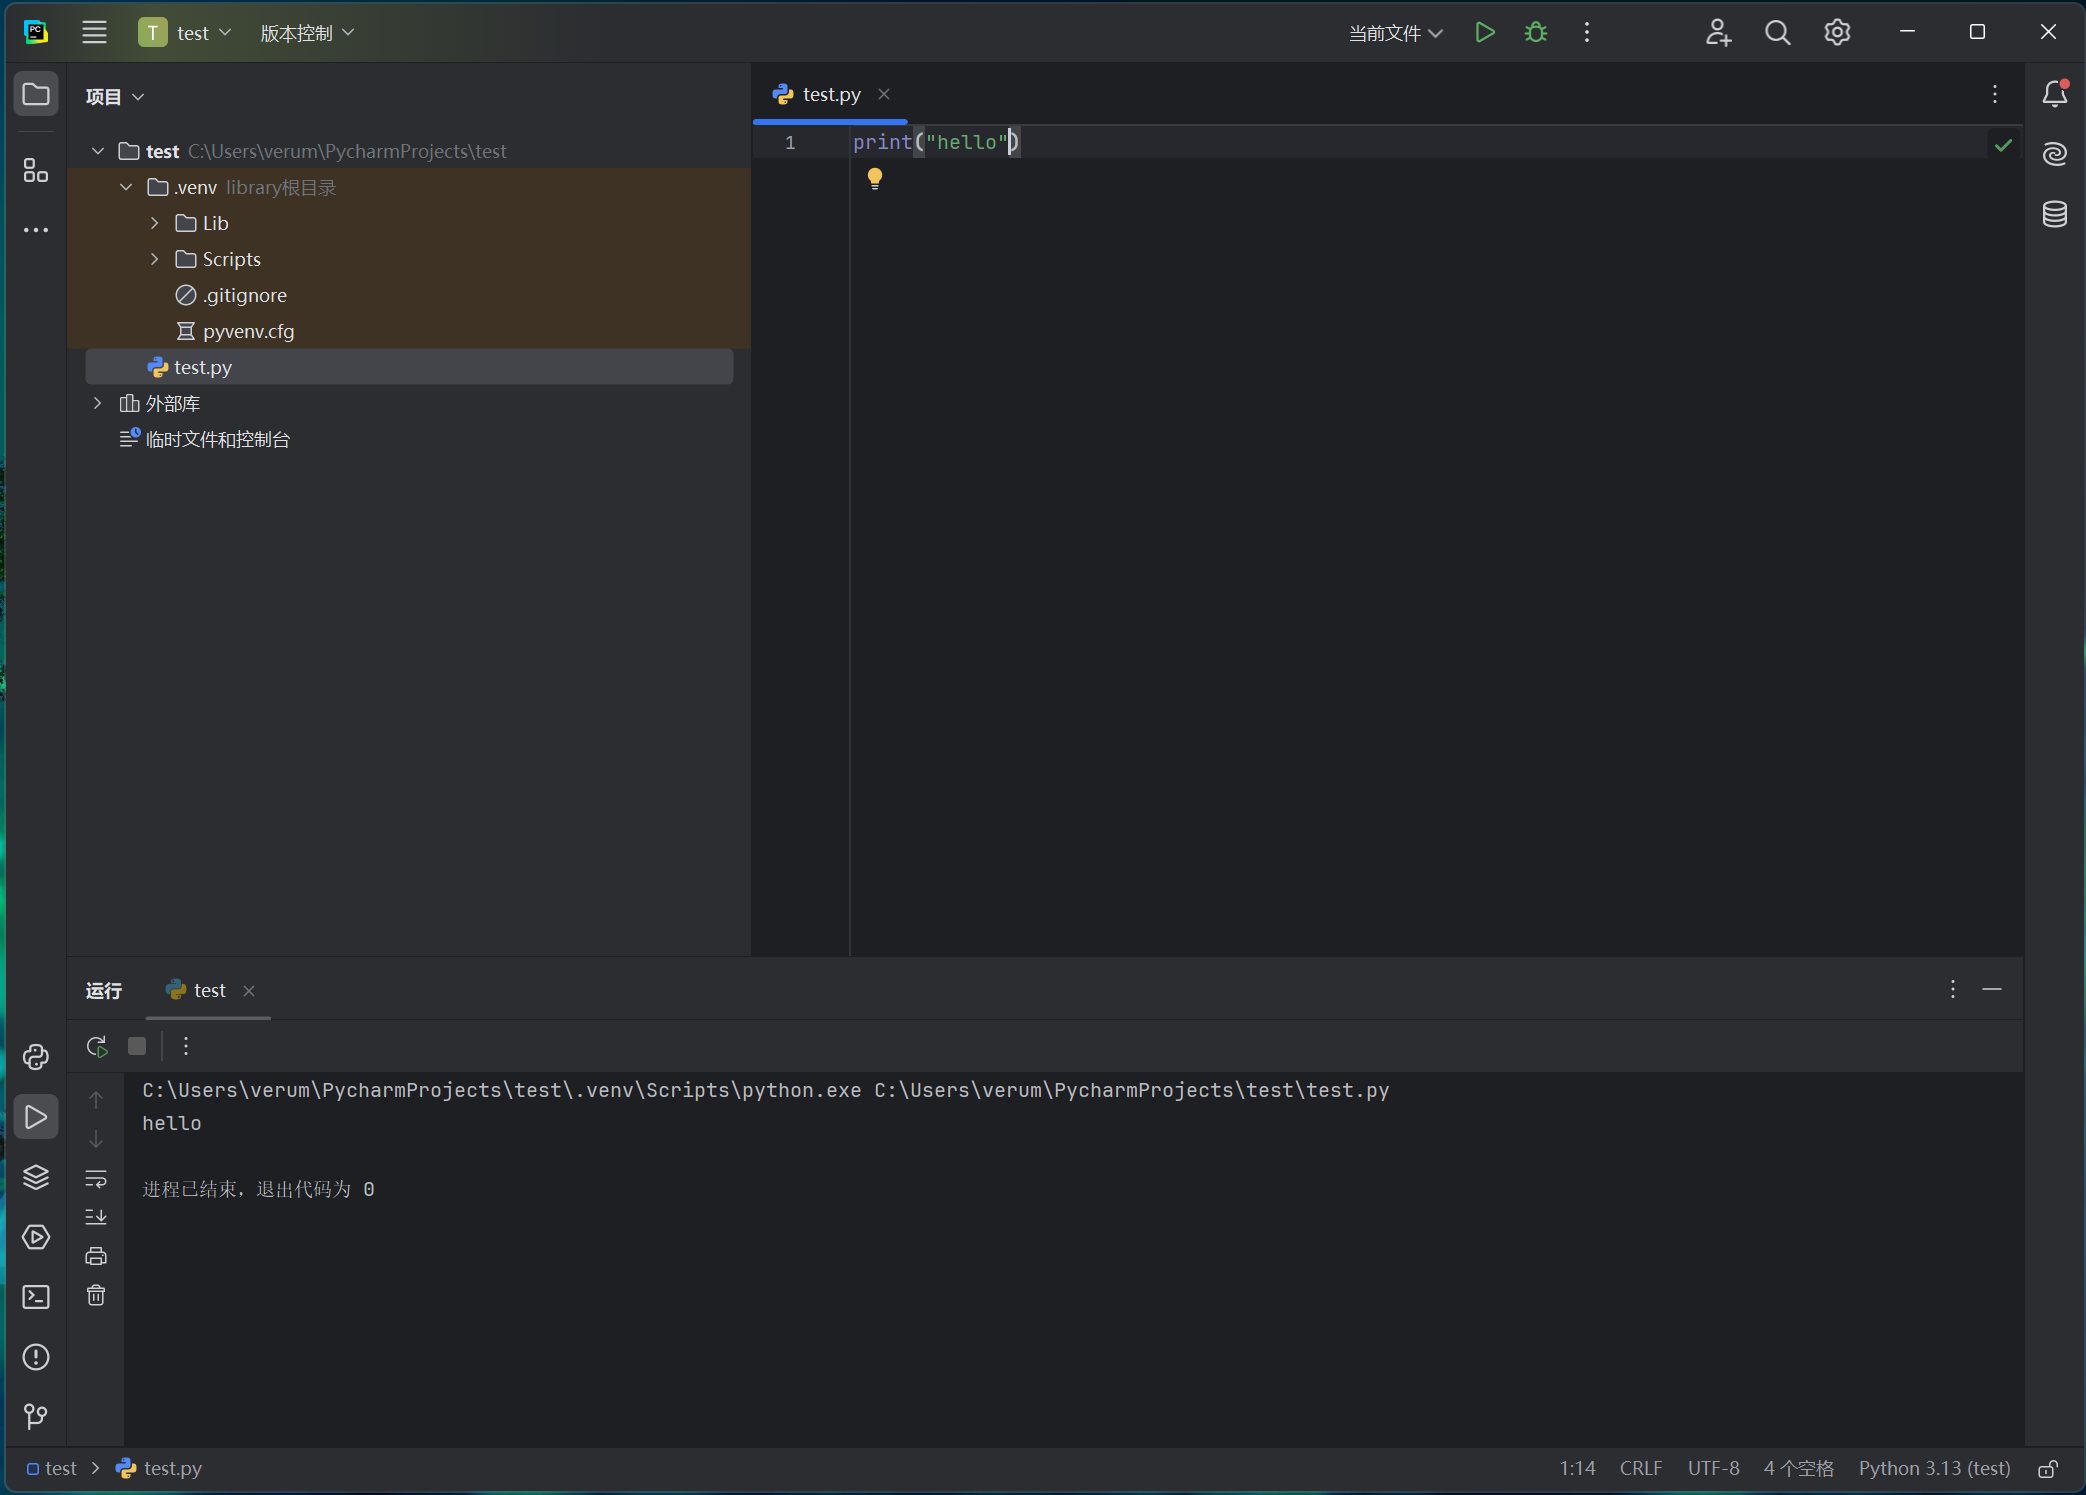
4.编写python程序
在Customize(定制)中可将语言设置为中文
五.Python的语法简述
这里有许多python书籍的电子版:https://github.com/square1979/Some_Books
Python 的语法结构是简洁和易读的。以下是 Python 中常见的语法元素和规则的详细概述:
1. 注释
- 单行注释:使用
#进行注释。
# 这是一个注释
- 多行注释:使用三引号(
'''或""")进行注释。
'''这是多行注释'''
"""
这也是多行注释
"""
2. 变量和数据类型
- 变量是可以被赋值的标签,也可以说变量指向特定的值
- 变量赋值:Python 是动态类型语言,变量不需要显式声明类型。
- ⽤引号引起的都是字符 串,其中的引号可以是单引号,也可以是双引号
x = 10  # 整数
y = 3.14  # 浮动数
name = "John"  # 字符串
is_active = True  # 布尔值
3. 数据结构
- 列表(List):有序、可变的集合。
my_list = [1, 2, 3, 4]
- 元组(Tuple):有序、不可变的集合。
my_tuple = (1, 2, 3)
- 字典(Dictionary):键值对的无序集合。
my_dict = {"name": "John", "age": 30}
- 集合(Set):无序、唯一元素的集合。
my_set = {1, 2, 3}
4. 控制结构
- 条件语句(if-elif-else):
if x > 0:
    print("x是正数")
elif x == 0:
    print("x是零")
else:
    print("x是负数")
- 循环语句(for 和 while):
for循环:
for i in range(5):
    print(i)
while循环:
count = 0
while count < 5:
    print(count)
    count += 1
5. 函数
- 定义函数使用
def:
def greet(name):
    return f"Hello, {name}!"
- 调用函数:
print(greet("Alice"))
6.用户输入
- input() 函数让程序暂停运⾏,等待⽤户输⼊⼀些⽂本
message = input("Tell me something, and I will repeat it back to you: ") print(message)
7. 异常处理
- 使用
try-except语句处理异常:
try:
    x = 1 / 0
except ZeroDivisionError:
    print("不能除以零")
8. 类和对象
- 定义类:
class Person:
    def __init__(self, name, age):
        self.name = name
        self.age = age

    def greet(self):
        print(f"Hello, my name is {self.name} and I am {self.age} years old.")
- 创建对象:
person = Person("John", 30)
person.greet()
9. 模块和包
- 导入模块:
import math
print(math.sqrt(16))  # 4.0
- 从模块中导入特定函数或类:
from math import sqrt
print(sqrt(16))  # 4.0
10. 列表推导式
- 列表推导式是用于创建新列表的一种简洁方法:
squares = [x ** 2 for x in range(5)]
print(squares)  # [0, 1, 4, 9, 16]
11. Lambda 表达式
- 使用
lambda定义匿名函数:
add = lambda x, y: x + y
print(add(2, 3))  # 5
12. 文件操作
- 读取文件:
with open('file.txt', 'r') as file:
    content = file.read()
    print(content)
- 写入文件:
with open('file.txt', 'w') as file:
    file.write("Hello, World!")
13. 列表操作
- 连接:使用
+连接列表。
list1 = [1, 2]
list2 = [3, 4]
combined = list1 + list2
print(combined)  # [1, 2, 3, 4]
- 重复:使用
*重复列表。
repeated = [1, 2] * 3
print(repeated)  # [1, 2, 1, 2, 1, 2]
14. 迭代器与生成器
- 迭代器:
nums = [1, 2, 3]
iter_nums = iter(nums)
print(next(iter_nums))  # 1
print(next(iter_nums))  # 2
- 生成器:使用
yield创建生成器。
def count_up_to(max):
    count = 1
    while count <= max:
        yield count
        count += 1
15. Python 特性
- 动态类型:Python 在运行时决定变量的类型。
- 自动内存管理:Python 使用垃圾回收机制自动管理内存。
- 缩进:Python 使用缩进来表示代码块,而不是大括号
{}。
16. 其他常用功能
- 字符串格式化:Python 3.6 引入了 f-string:
name = "Alice"
age = 30
print(f"My name is {name} and I am {age} years old.")
- 枚举(Enum):定义一组常量:
from enum import Enum

class Color(Enum):
    RED = 1
    GREEN = 2
    BLUE = 3
这只是 Python 语法的一部分。Python 的语法非常丰富,涵盖了从基础到高级的多种特性和功能。在实际编码中,你会根据需求选择使用不同的语法结构和功能。
六.Python的语法详述
1.变量
1.1 定义变量
变量不需要声明类型,直接赋值即可。
x = 10          # 整数
name = "Alice"  # 字符串
is_valid = True # 布尔值
1.2 变量命名规则
- 必须以字母或下划线开头。
- 后续可以包含字母、数字和下划线。
- 不能使用 Python 的关键字(如
if,else,def)。 - 区分大小写:
name和Name是不同的变量。
1.3 多变量赋值
可以在一行中赋值多个变量。
a, b, c = 1, 2, "hello"
print(a, b, c)  # 输出: 1 2 hello
将同一个值赋给多个变量:
x = y = z = 0
print(x, y, z)  # 输出: 0 0 0
1.4 变量的引用和内存管理
Python 中的变量是对对象的引用。
a = [1, 2, 3]  # 列表
b = a           # b 指向与 a 相同的列表
b.append(4)
print(a)        # 输出: [1, 2, 3, 4]
2. 数据类型
Python 提供多种内置数据类型,主要分为以下几类。
2.1 数值类型
包括整数(int)、浮点数(float)、复数(complex)。
2.1.1 整数操作
x = 10
y = 3
print(x + y)  # 加法: 13
print(x - y)  # 减法: 7
print(x * y)  # 乘法: 30
print(x / y)  # 除法: 3.333...
print(x // y) # 整除: 3
print(x % y)  # 取余: 1
print(x ** y) # 幂: 1000
2.1.2 浮点数操作
浮点数支持相同的运算。
a = 5.5
b = 2.2
print(round(a + b, 2))  # 输出: 7.7
2.1.3 复数
使用 j 表示虚数单位。
z = 2 + 3j
print(z.real, z.imag)  # 输出: 2.0 3.0
2.2 字符串(str)
2.2.1 字符串操作
s = "hello"
print(len(s))          # 长度: 5
print(s.upper())       # 转大写: HELLO
print(s.lower())       # 转小写: hello
print(s.capitalize())  # 首字母大写: Hello
print(s * 3)           # 重复: hellohellohello
2.2.2 字符串切片
s = "Python"
print(s[0])       # 输出: P
print(s[-1])      # 输出: n
print(s[1:4])     # 输出: yth
2.2.3 格式化字符串
name = "Alice"
age = 25
print(f"My name is {name}, and I am {age} years old.")
2.3 布尔类型(bool)
布尔值只有 True 和 False。
print(5 > 3)  # 输出: True
print(bool(0))  # 输出: False
print(bool("Non-empty"))  # 输出: True
2.4 列表(list)
2.4.1 列表创建和访问
lst = [1, 2, 3, "hello"]
print(lst[0])  # 输出: 1
print(lst[-1]) # 输出: hello
2.4.2 常见操作
lst.append(4)      # 添加元素
lst.insert(1, 10)  # 插入元素
lst.remove(10)     # 删除指定值
lst.pop()          # 弹出最后一个值
lst.sort()         # 排序
2.5 元组(tuple)
元组是不可变的序列。
t = (1, 2, 3)
print(t[0])  # 输出: 1
2.6 字典(dict)
2.6.1 创建字典
d = {"name": "Alice", "age": 25}
print(d["name"])  # 输出: Alice
2.6.2 操作
d["age"] = 26       # 修改值
d["gender"] = "F"   # 添加键值对
del d["gender"]     # 删除键值对
2.7 集合(set)
集合是无序且不重复的元素集合。
s = {1, 2, 3}
s.add(4)  # 添加元素
s.remove(2)  # 删除元素
2.8. 类型转换
x = "123"
print(int(x))  # 转换为整数: 123
print(float(x))  # 转换为浮点数: 123.0
print(list(x))  # 转换为列表: ['1', '2', '3']
print(tuple(x)) # 转换为元组: ('1', '2', '3')
print(set(x))   # 转换为集合: {'1', '3', '2'}
2. 9.数据类型判断
使用 type() 判断类型。
x = 10
print(type(x))  # 输出: <class 'int'>
3.字符串
3.1. 使用字符串方法操作
- 更改大小写
my_string.upper()     # 全部转为大写
my_string.lower()     # 全部转为小写
my_string.capitalize()  # 整个字符串的首字母大写,其余字母小写
my_string.title() #将字符串中的每个单词的首字母大写,其余字母小写
- 去除空白
my_string.strip()     # 去除两端的空白字符
my_string.lstrip()    # 去除左侧空白字符
my_string.rstrip()    # 去除右侧空白字符
- 分割和合并
parts = my_string.split(",")    # 按逗号分割字符串
joined = " ".join(parts)        # 用空格连接多个字符串
- 替换内容
new_string = my_string.replace("world", "Python") # 替换子字符串
- 删除前缀
nostarch_url = 'https://nostarch.com' #删除URL前缀 https://
nostarch_url.removeprefix('https://')
# 输出'nostarch.com'
3.2. 格式化字符串
Python 支持多种格式化字符串的方式:
传统格式化
formatted = "Hello, %s!" % "world"
str.format 方法
formatted = "Hello, {}!".format("world")
f-string(Python 3.6+)
name = "world"
formatted = f"Hello, {name}!"
3.3. 字符串切片
字符串是不可变的,可以通过索引和切片操作获取子字符串。
my_string = "Hello, world!"
substring = my_string[0:5]   # 获取前5个字符 "Hello"
reversed_string = my_string[::-1]  # 反转字符串
3.4. 检查内容
可以使用方法或运算符检查字符串的内容:
- 查找字符
position = my_string.find("world")  # 返回子字符串的位置
exists = "world" in my_string       # 检查是否存在
- 统计次数
count = my_string.count("l") # 统计字符 'l' 出现的次数
- 判断条件
is_alpha = my_string.isalpha()   # 是否全是字母
is_digit = my_string.isdigit()   # 是否全是数字
is_space = my_string.isspace()   # 是否全是空白字符
3.5. 多行字符串
使用三引号存储多行字符串。
multi_line = """This is a
multi-line string."""
3.6. 字符串编码
可以将字符串编码为字节或从字节解码:
encoded = my_string.encode("utf-8")  # 编码为字节
decoded = encoded.decode("utf-8")   # 从字节解码回字符串
3.7. 字符串拼接
拼接多个字符串:
part1 = "Hello"
part2 = "world"
combined = part1 + ", " + part2 + "!"
要在字符串中插⼊变量的值,可先在左引号前加上字⺟ f ,再将要 插⼊的变量放在花括号内。这样, Python 在显⽰字符串时,将把每个变量 都替换为其值。 这种字符串称为 f 字符串。 f 是 format (设置格式)的简写,因为 Python 通 过把花括号内的变量替换为其值来设置字符串的格式。
first_name = "ada"
last_name = "lovelace"
full_name = f"{first_name} {last_name}"
print(f"Hello, {full_name.title()}!")
4.列表
4.1. 创建列表
- 空列表:
my_list = []
my_list = list()  # 等价于上面
- 带初始值的列表:
my_list = [1, 2, 3, 4]
my_list = ["apple", "banana", "cherry"]
- 混合数据类型:
my_list = [1, "hello", 3.14, [1, 2, 3]]
4.2. 访问列表元素
- 通过索引访问:
my_list = [10, 20, 30, 40, 50]
print(my_list[0])  # 10,正向索引从 0 开始
print(my_list[-1])  # 50,反向索引从 -1 开始
- 切片访问:
print(my_list[1:4])  # [20, 30, 40],不包含结束索引
print(my_list[:3])   # [10, 20, 30],省略起始默认为 0
print(my_list[2:])   # [30, 40, 50],省略结束默认为最后
print(my_list[::2])  # [10, 30, 50],步长为 2
4.3. 修改列表
- 通过索引修改:
my_list = [1, 2, 3]
my_list[1] = 20
print(my_list)  # [1, 20, 3]
- 通过切片修改:
my_list[1:3] = [200, 300]
print(my_list)  # [1, 200, 300]
4.4. 添加元素
append():在末尾添加单个元素
my_list = [1, 2, 3]
my_list.append(4)
print(my_list)  # [1, 2, 3, 4]
insert():在指定位置插入元素
my_list = [1, 2, 3]
my_list.insert(1, 100)
print(my_list)  # [1, 100, 2, 3]
extend():扩展列表(可添加多个元素)
my_list = [1, 2, 3]
my_list.extend([4, 5, 6])
print(my_list)  # [1, 2, 3, 4, 5, 6]
4.5. 删除元素
remove():删除指定值(仅删除第一个匹配项)
my_list = [1, 2, 3, 2]
my_list.remove(2)
print(my_list)  # [1, 3, 2]
pop():删除指定索引的元素并返回它
my_list = [1, 2, 3]
value = my_list.pop(1)
print(value)  # 2
print(my_list)  # [1, 3]
del:删除指定索引或切片
my_list = [1, 2, 3, 4]
del my_list[1]
print(my_list)  # [1, 3, 4]
del my_list[1:3]
print(my_list)  # [1]
clear():清空列表
my_list = [1, 2, 3]
my_list.clear()
print(my_list)  # []
4.6. 搜索元素
index():返回指定元素的索引
my_list = [10, 20, 30]
print(my_list.index(20))  # 1
count():返回指定元素的数量
my_list = [1, 2, 2, 3]
print(my_list.count(2))  # 2
4.7. 排序和反转
sort():原地排序(默认升序)
my_list = [3, 1, 2]
my_list.sort()
print(my_list)  # [1, 2, 3]
sort(reverse=True):降序排序
my_list.sort(reverse=True)
print(my_list)  # [3, 2, 1]
reverse():原地反转列表
my_list = [1, 2, 3]
my_list.reverse()
print(my_list)  # [3, 2, 1]
sorted():返回排序后的新列表,不改变原列表
my_list = [3, 1, 2]
new_list = sorted(my_list)
print(new_list)  # [1, 2, 3]
print(my_list)  # [3, 1, 2]
4.8. 其他操作
- 长度:
len()
my_list = [1, 2, 3]
print(len(my_list))  # 3
- 最大值和最小值:
max()和min()
my_list = [1, 2, 3]
print(max(my_list))  # 3
print(min(my_list))  # 1
- 检查元素是否在列表中:
in和not in
my_list = [1, 2, 3]
print(2 in my_list)  # True
print(4 not in my_list)  # True
- 复制列表
my_list = [1, 2, 3]
copy_list = my_list.copy()
print(copy_list)  # [1, 2, 3]
4.9. 列表的高级操作
- 列表推导式:用于生成新的列表
squares = [x**2 for x in range(5)]
print(squares)  # [0, 1, 4, 9, 16]
- 嵌套列表:
matrix = [[1, 2], [3, 4]]
print(matrix[0][1])  # 2
zip()函数:合并多个列表
list1 = [1, 2, 3]
list2 = ['a', 'b', 'c']
combined = list(zip(list1, list2))
print(combined)  # [(1, 'a'), (2, 'b'), (3, 'c')]
4.10. 性能优化
- 避免频繁插入或删除(尤其是首部):列表在插入或删除时需要调整其他元素的索引。
- 使用
deque:如果需要频繁的首部操作,可以使用collections.deque提高性能。
5.元组
5.1. 创建元组
- 空元组:
my_tuple = ()
my_tuple = tuple()  # 等价于上面
- 带初始值的元组:
my_tuple = (1, 2, 3)
my_tuple = ("apple", "banana", "cherry")
- 单个元素的元组: 必须在单个元素后加逗号,否则会被解释为普通的括号表达式:
single_tuple = (1,)  # 正确
not_a_tuple = (1)    # 错误,类型为 int
- 混合数据类型的元组:
my_tuple = (1, "hello", 3.14, [1, 2, 3])
- 使用
tuple()创建元组:
my_tuple = tuple([1, 2, 3])  # 将列表转为元组
print(my_tuple)  # (1, 2, 3)
5.2. 访问元组元素
- 通过索引访问:
my_tuple = (10, 20, 30, 40, 50)
print(my_tuple[0])  # 10,正向索引从 0 开始
print(my_tuple[-1])  # 50,反向索引从 -1 开始
- 切片访问:
print(my_tuple[1:4])  # (20, 30, 40),不包含结束索引
print(my_tuple[:3])   # (10, 20, 30)
print(my_tuple[2:])   # (30, 40, 50)
print(my_tuple[::2])  # (10, 30, 50),步长为 2
5.3. 元组的不可变性
元组的元素一旦定义,就无法修改、删除或添加:
- 试图修改元素:
my_tuple = (1, 2, 3)
my_tuple[1] = 100  # 抛出 TypeError
- 试图删除元素:
del my_tuple[1] # 抛出 TypeError
但如果元组中包含可变对象(如列表),其内容是可以修改的:
my_tuple = (1, [2, 3], 4)
my_tuple[1][0] = 200
print(my_tuple)  # (1, [200, 3], 4)
5.4. 常用操作
(1) 合并元组
使用 + 将两个元组合并成一个新元组:
tuple1 = (1, 2)
tuple2 = (3, 4)
combined = tuple1 + tuple2
print(combined)  # (1, 2, 3, 4)
(2) 复制元组
使用 * 重复元组中的元素:
my_tuple = (1, 2)
repeated = my_tuple * 3
print(repeated)  # (1, 2, 1, 2, 1, 2)
(3) 判断元素是否在元组中
使用 in 或 not in 检查元素:
my_tuple = (1, 2, 3)
print(2 in my_tuple)  # True
print(4 not in my_tuple)  # True
(4) 获取元素数量:count()
统计某个值在元组中出现的次数:
my_tuple = (1, 2, 2, 3)
print(my_tuple.count(2))  # 2
(5) 获取元素索引:index()
返回第一个匹配值的索引:
my_tuple = (10, 20, 30, 20)
print(my_tuple.index(20))  # 1
5.5. 解包元组
- 普通解包:
my_tuple = (1, 2, 3)
a, b, c = my_tuple
print(a, b, c)  # 1 2 3
- 使用
*收集剩余元素:
my_tuple = (1, 2, 3, 4)
a, *b, c = my_tuple
print(a)  # 1
print(b)  # [2, 3]
print(c)  # 4
5.6. 元组的遍历
可以使用 for 循环遍历元组:
my_tuple = (10, 20, 30)
for item in my_tuple:
    print(item)
5.7. 元组的排序和转换
- 排序元组: 元组本身不能修改,但可以通过
sorted()返回排序后的列表:
my_tuple = (3, 1, 2)
sorted_list = sorted(my_tuple)
print(sorted_list)  # [1, 2, 3]
- 元组与列表互相转换:
my_tuple = (1, 2, 3)
my_list = list(my_tuple)  # 转为列表
new_tuple = tuple(my_list)  # 再转为元组
5.8. 嵌套元组
元组可以包含元组:
nested_tuple = ((1, 2), (3, 4))
print(nested_tuple[1][0])  # 3
5.9. 元组的特殊用法
(1) 用作字典键
元组是不可变的,可以作为字典的键:
my_dict = {(1, 2): "value"}
print(my_dict[(1, 2)])  # value
(2) 用于返回多个值
函数可以通过元组返回多个值:
def get_coordinates():
    return (10, 20)

x, y = get_coordinates()
print(x, y)  # 10 20
5.10. 元组的性能
由于元组是不可变的,内存和性能方面优于列表,特别是在需要频繁操作但数据内容不变时使用元组是更高效的选择。
6.字典
6.1. 字典的创建
创建空字典
my_dict = {}
my_dict = dict()
创建非空字典
# 直接赋值
my_dict = {"name": "Alice", "age": 25, "city": "New York"}

# 使用 dict() 函数
my_dict = dict(name="Alice", age=25, city="New York")

# 使用元组列表
my_dict = dict([("name", "Alice"), ("age", 25), ("city", "New York")])

# 使用字典推导式
keys = ["name", "age", "city"]
values = ["Alice", 25, "New York"]
my_dict = {k: v for k, v in zip(keys, values)}
6.2. 字典的访问
通过键访问值
my_dict = {"name": "Alice", "age": 25}
print(my_dict["name"])  # Alice
使用 get() 方法
- 避免
KeyError的安全方式:
print(my_dict.get("name"))      # Alice
print(my_dict.get("gender"))    # None
print(my_dict.get("gender", "Not Specified"))  # Not Specified
6.3. 添加或更新键值对
直接添加/更新
my_dict["age"] = 30  # 更新键值对
my_dict["gender"] = "Female"  # 添加新键值对
print(my_dict)  # {'name': 'Alice', 'age': 30, 'gender': 'Female'}
使用 update()
- 批量更新或添加键值对:
my_dict.update({"age": 35, "city": "London"})
print(my_dict)  # {'name': 'Alice', 'age': 35, 'gender': 'Female', 'city': 'London'}
6.4. 删除键值对
使用 del
del my_dict["age"]
print(my_dict)  # {'name': 'Alice', 'gender': 'Female'}
使用 pop()
- 删除键并返回其值:
removed_value = my_dict.pop("gender")
print(removed_value)  # Female
print(my_dict)  # {'name': 'Alice'}
使用 popitem()
- 删除并返回最后一个键值对(Python 3.7+):
last_item = my_dict.popitem()
print(last_item)  # ('city', 'London')
清空字典
my_dict.clear()
print(my_dict)  # {}
6.5. 遍历字典
遍历键
for key in my_dict:
    print(key)
遍历值
for value in my_dict.values():
    print(value)
遍历键值对
for key, value in my_dict.items():
    print(f"{key}: {value}")
6.6. 字典的方法
获取键、值和键值对
keys = my_dict.keys()      # dict_keys(['name', 'age', 'city'])
values = my_dict.values()  # dict_values(['Alice', 25, 'New York'])
items = my_dict.items()    # dict_items([('name', 'Alice'), ('age', 25), ('city', 'New York')])
检查键是否存在
print("name" in my_dict)  # True
print("gender" not in my_dict)  # True
从默认值创建字典
new_dict = dict.fromkeys(["a", "b", "c"], 0)
print(new_dict)  # {'a': 0, 'b': 0, 'c': 0}
获取键的默认值
value = my_dict.setdefault("gender", "Female")
print(value)  # Female
print(my_dict)  # {'name': 'Alice', 'age': 25, 'city': 'New York', 'gender': 'Female'}
6.7. 字典的操作示例
合并两个字典
- 使用
update():
dict1 = {"a": 1, "b": 2}
dict2 = {"b": 3, "c": 4}
dict1.update(dict2)
print(dict1)  # {'a': 1, 'b': 3, 'c': 4}
- 使用字典合并运算符(Python 3.9+):
dict1 = {"a": 1, "b": 2}
dict2 = {"b": 3, "c": 4}
new_dict = dict1 | dict2
print(new_dict)  # {'a': 1, 'b': 3, 'c': 4}
字典推导式
squares = {x: x**2 for x in range(5)}
print(squares)  # {0: 0, 1: 1, 2: 4, 3: 9, 4: 16}
统计字符串中字符的频率
from collections import Counter
text = "hello world"
frequency = Counter(text)
print(frequency)  # Counter({'l': 3, 'o': 2, 'h': 1, 'e': 1, ' ': 1, 'w': 1, 'r': 1, 'd': 1})
6.8. 字典的常见错误与注意事项
-
键必须是不可变的:
- 常见键类型:
str,int,tuple - 不可使用可变类型作为键,如列表。
- 常见键类型:
my_dict = {[1, 2]: "value"} # TypeError: unhashable type: 'list'
-
键唯一性:
- 如果插入重复的键,后插入的值会覆盖之前的值:
my_dict = {"a": 1, "a": 2}
print(my_dict)  # {'a': 2}
6.9. 字典的高级用法
排序字典
- 按键排序:
sorted_dict = dict(sorted(my_dict.items()))
- 按值排序:
sorted_dict = dict(sorted(my_dict.items(), key=lambda item: item[1]))
深拷贝
- 使用
copy仅进行浅拷贝。 - 深拷贝需要使用
copy模块:
import copy
deep_copy_dict = copy.deepcopy(my_dict)
7.条件判断
7.1.基本条件语句
条件语句通过 if-elif-else 来控制代码的执行流程。
x = 10
if x > 0:
    print("Positive")
elif x == 0:
    print("Zero")
else:
    print("Negative")
7.2.单行条件语句
x = 10
print("Positive") if x > 0 else print("Negative or Zero")
7.3.比较运算符
| 运算符 | 描述 | 示例 |
|---|---|---|
== |
等于 | x == y |
!= |
不等于 | x != y |
< |
小于 | x < y |
> |
大于 | x > y |
<= |
小于等于 | x <= y |
>= |
大于等于 | x >= y |
7.4.逻辑运算符
| 运算符 | 描述 | 示例 |
|---|---|---|
and |
全部条件为真 | x > 0 and x < 10 |
or |
至少一个条件为真 | x > 0 or x < -10 |
not |
取反 | not (x > 0) |
7.5.成员运算符
| 运算符 | 描述 | 示例 |
|---|---|---|
in |
检查元素是否存在 | 'a' in ['a', 'b'] |
not in |
检查元素是否不存在 | 'c' not in ['a', 'b'] |
7.6.身份运算符
| 运算符 | 描述 | 示例 |
|---|---|---|
is |
判断两个对象是否相同 | a is b |
is not |
判断两个对象是否不同 | a is not b |
7.7.嵌套条件语句
x = 10
if x > 0:
    if x % 2 == 0:
        print("Positive and Even")
    else:
        print("Positive and Odd")
8.循环
Python 提供了两种循环:for 循环和 while 循环。
8.1.for循环
用于遍历可迭代对象(如列表、元组、字符串、字典、集合等)。
# 遍历列表
for item in [1, 2, 3]:
    print(item)

# 遍历字符串
for char in "hello":
    print(char)

# 遍历字典
my_dict = {"name": "Alice", "age": 25}
for key, value in my_dict.items():
    print(f"{key}: {value}")
8.2.while循环
根据条件反复执行代码,直到条件为 False。
x = 0
while x < 5:
    print(x)
    x += 1
8.3.循环控制关键字
break
用于终止整个循环。
for i in range(5):
    if i == 3:
        break
    print(i)  # 输出 0, 1, 2
continue
跳过当前循环的剩余部分,继续下一次迭代。
for i in range(5):
    if i == 3:
        continue
    print(i)  # 输出 0, 1, 2, 4
else
与 for 或 while 搭配使用,循环未被 break 中断时执行。
for i in range(5):
    if i == 3:
        break
else:
    print("Completed without break")  # 不执行

while False:
    pass
else:
    print("While loop completed")  # 执行
8.4.循环常用函数
range()
生成一系列数字。
for i in range(5):       # 0, 1, 2, 3, 4
    print(i)

for i in range(1, 5):    # 1, 2, 3, 4
    print(i)

for i in range(1, 10, 2): # 1, 3, 5, 7, 9
    print(i)
enumerate()
用于同时获取元素及其索引。
my_list = ['a', 'b', 'c']
for index, value in enumerate(my_list):
    print(index, value)  # 输出 (0, 'a'), (1, 'b'), (2, 'c')
zip()
将多个可迭代对象打包成元组。
names = ["Alice", "Bob", "Charlie"]
ages = [25, 30, 35]
for name, age in zip(names, ages):
    print(name, age)  # 输出 ('Alice', 25), ('Bob', 30), ('Charlie', 35)
reversed()
反转可迭代对象。
for i in reversed(range(5)):
    print(i)  # 输出 4, 3, 2, 1, 0
sorted()
排序可迭代对象。
for i in sorted([3, 1, 2]):
    print(i)  # 输出 1, 2, 3
8.5.列表推导式
列表推导式可以简洁地生成新列表。
# 生成平方数列表
squares = [x**2 for x in range(5)]
print(squares)  # [0, 1, 4, 9, 16]

# 带条件的推导式
evens = [x for x in range(10) if x % 2 == 0]
print(evens)  # [0, 2, 4, 6, 8]
8.6.无限循环
当条件始终为真时会形成无限循环,需要配合 break 结束循环。
while True:
    x = input("Enter something: ")
    if x == "exit":
        break
    print(f"You entered {x}")
8.7.嵌套循环
可以在循环内部嵌套其他循环。
for i in range(3):
    for j in range(2):
        print(f"i={i}, j={j}")
8.8.循环和条件的结合
for i in range(10):
    if i % 2 == 0:
        print(f"{i} is even")
    else:
        print(f"{i} is odd")
9.函数
9.1. 定义函数
使用 def 关键字定义函数。
def greet(name):
    return f"Hello, {name}!"
调用:
print(greet("Alice")) # 输出: Hello, Alice!
9.2. 参数类型
9.2.1 位置参数
按参数位置传递值。
def add(a, b):
    return a + b
print(add(5, 3))  # 输出: 8
9.2.2 默认参数
给参数设置默认值,当未传入该参数时使用默认值。
def greet(name, greeting="Hello"):
    return f"{greeting}, {name}!"
print(greet("Alice"))        # 输出: Hello, Alice!
print(greet("Alice", "Hi"))  # 输出: Hi, Alice!
9.2.3 可变位置参数 (*args)
将所有未命名的位置参数收集为一个元组。
def sum_numbers(*args):
    return sum(args)
print(sum_numbers(1, 2, 3, 4))  # 输出: 10
9.2.4 可变关键字参数 (**kwargs)
将所有未命名的关键字参数收集为一个字典。
def print_info(**kwargs):
    for key, value in kwargs.items():
        print(f"{key}: {value}")
print_info(name="Alice", age=25)
# 输出:
# name: Alice
# age: 25
9.2.5 强制关键字参数
使用 * 后的参数必须以关键字形式传递。
def greet(name, *, greeting="Hello"):
    return f"{greeting}, {name}!"
print(greet("Alice", greeting="Hi"))  # 输出: Hi, Alice!
9.2.6 解包参数
利用 * 和 ** 解包序列或字典传递给函数。
def greet(name, greeting):
    return f"{greeting}, {name}!"
args = ("Alice", "Hi")
print(greet(*args))  # 输出: Hi, Alice!

kwargs = {"name": "Alice", "greeting": "Hello"}
print(greet(**kwargs))  # 输出: Hello, Alice!
9.3. 返回值
9.3.1 单个返回值
def square(x):
    return x ** 2
print(square(4))  # 输出: 16
9.3.2 多个返回值
返回多个值会组成一个元组。
def operations(a, b):
    return a + b, a - b, a * b, a / b
result = operations(10, 2)
print(result)         # 输出: (12, 8, 20, 5.0)
add, sub, mul, div = result
print(add, sub)       # 输出: 12, 8
9.4. 函数作用域
9.4.1 局部变量和全局变量
局部变量在函数内声明,仅在函数内部有效。
x = 10  # 全局变量

def change_value():
    x = 20  # 局部变量
    print("Inside function:", x)

change_value()         # 输出: Inside function: 20
print("Outside function:", x)  # 输出: Outside function: 10
9.4.2 使用 global 修改全局变量
x = 10

def change_global():
    global x
    x = 20

change_global()
print(x)  # 输出: 20
9.4.3 使用 nonlocal 修改外部非全局变量
def outer():
    x = 10
    def inner():
        nonlocal x
        x = 20
    inner()
    print(x)

outer()  # 输出: 20
9.5. 匿名函数
使用 lambda 定义匿名函数,适用于简单操作。
square = lambda x: x ** 2
print(square(4))  # 输出: 16

add = lambda a, b: a + b
print(add(2, 3))  # 输出: 5
9.6. 高阶函数
9.6.1 map
对可迭代对象中的每个元素应用函数。
nums = [1, 2, 3, 4]
squared = map(lambda x: x ** 2, nums)
print(list(squared))  # 输出: [1, 4, 9, 16]
9.6.2 filter
筛选出满足条件的元素。
nums = [1, 2, 3, 4]
evens = filter(lambda x: x % 2 == 0, nums)
print(list(evens))  # 输出: [2, 4]
9.6.3 reduce
通过累积函数合并元素。
from functools import reduce
nums = [1, 2, 3, 4]
product = reduce(lambda x, y: x * y, nums)
print(product)  # 输出: 24
9.7. 函数装饰器
装饰器是用于修改函数行为的高阶函数。
9.7.1 定义装饰器
def my_decorator(func):
    def wrapper():
        print("Something before the function.")
        func()
        print("Something after the function.")
    return wrapper

@my_decorator
def say_hello():
    print("Hello!")

say_hello()
# 输出:
# Something before the function.
# Hello!
# Something after the function.
9.8. 内置函数
Python 提供了一些常用的内置函数:
| 函数 | 描述 |
|---|---|
abs() |
返回绝对值 |
len() |
返回长度 |
max() |
返回最大值 |
min() |
返回最小值 |
sum() |
返回总和 |
sorted() |
返回排序后的列表 |
type() |
返回对象的类型 |
id() |
返回对象的唯一标识 |
help() |
显示帮助文档 |
9.9. 文档字符串
函数可以包含文档字符串,用于描述其功能。
def greet(name):
    """
    Greets a person with the given name.

    Args:
        name (str): The name of the person.

    Returns:
        str: The greeting message.
    """
    return f"Hello, {name}!"

print(greet.__doc__)
10.类
10.1. 基本定义
10.1.1 定义类
使用 class 关键字定义类:
class MyClass:
    pass  # 表示空类
10.1.2 创建对象
类的实例化会创建一个对象:
obj = MyClass()
print(obj)  # 输出: <__main__.MyClass object at 0x...>
10.2. 类的属性和方法
10.2.1 实例属性
实例属性是每个对象独有的。可以通过 __init__ 方法定义。
class MyClass:
    def __init__(self, name, age):
        self.name = name  # 实例属性
        self.age = age

# 创建对象
person = MyClass("Alice", 25)
print(person.name)  # 输出: Alice
print(person.age)   # 输出: 25
10.2.2 实例方法
实例方法是操作实例属性的函数,必须包含 self 参数。
class MyClass:
    def __init__(self, name):
        self.name = name

    def greet(self):
        return f"Hello, {self.name}!"

person = MyClass("Alice")
print(person.greet())  # 输出: Hello, Alice!
10.2.3 类属性
类属性是所有实例共享的属性,用于定义与实例无关的数据。
class MyClass:
    species = "Human"  # 类属性

    def __init__(self, name):
        self.name = name

print(MyClass.species)  # 输出: Human
person = MyClass("Alice")
print(person.species)   # 输出: Human
10.2.4 类方法
类中的函数称作方法
类方法用 @classmethod 装饰器定义,第一个参数为 cls,表示类本身。
class MyClass:
    species = "Human"

    @classmethod
    def set_species(cls, species):
        cls.species = species

MyClass.set_species("SuperHuman")
print(MyClass.species)  # 输出: SuperHuman
10.2.5 静态方法
静态方法不依赖类或实例,使用 @staticmethod 装饰器定义。
class MyClass:
    @staticmethod
    def add(a, b):
        return a + b

print(MyClass.add(2, 3))  # 输出: 5
10.3. 特殊方法(魔法方法)
10.3.1 __init__: 初始化方法
在创建对象时自动调用,用于初始化实例属性。
class MyClass:
    def __init__(self, name):
        self.name = name
10.3.2 __str__: 字符串表示
用于定义类的字符串表示。
class MyClass:
    def __init__(self, name):
        self.name = name

    def __str__(self):
        return f"My name is {self.name}."

person = MyClass("Alice")
print(person)  # 输出: My name is Alice.
10.3.3 运算符重载
通过重写魔法方法,可以改变对象的运算行为。
class Point:
    def __init__(self, x, y):
        self.x = x
        self.y = y

    def __add__(self, other):
        return Point(self.x + other.x, self.y + other.y)

    def __str__(self):
        return f"({self.x}, {self.y})"

p1 = Point(1, 2)
p2 = Point(3, 4)
print(p1 + p2)  # 输出: (4, 6)
10.4. 继承与多态
10.4.1 单继承
子类继承父类的属性和方法。
class Parent:
    def greet(self):
        return "Hello from Parent"

class Child(Parent):
    pass

child = Child()
print(child.greet())  # 输出: Hello from Parent
10.4.2 方法重写
子类可以重写父类的方法。
class Parent:
    def greet(self):
        return "Hello from Parent"

class Child(Parent):
    def greet(self):
        return "Hello from Child"

child = Child()
print(child.greet())  # 输出: Hello from Child
10.4.3 多继承
一个类可以继承多个父类。
class A:
    def method_a(self):
        return "Method from A"

class B:
    def method_b(self):
        return "Method from B"

class C(A, B):
    pass

c = C()
print(c.method_a())  # 输出: Method from A
print(c.method_b())  # 输出: Method from B
10.5. 属性和方法的访问控制
10.5.1 公有属性
Python 中的属性默认是公有的,直接访问即可。
class MyClass:
    def __init__(self, name):
        self.name = name  # 公有属性

obj = MyClass("Alice")
print(obj.name)  # 输出: Alice
10.5.2 私有属性
通过在属性名前加双下划线 __ 定义私有属性。
class MyClass:
    def __init__(self, name):
        self.__name = name  # 私有属性

    def get_name(self):
        return self.__name

obj = MyClass("Alice")
print(obj.get_name())  # 输出: Alice
10.6. 类的高级操作
10.6.1 类的动态属性
可以动态地为类或对象添加属性。
class MyClass:
    pass

obj = MyClass()
obj.name = "Alice"  # 动态添加属性
print(obj.name)     # 输出: Alice
10.6.2 @property 装饰器
将方法转换为属性,使其可以像访问变量一样使用。
class MyClass:
    def __init__(self, name):
        self.__name = name

    @property
    def name(self):
        return self.__name

    @name.setter
    def name(self, value):
        self.__name = value

person = MyClass("Alice")
print(person.name)  # 输出: Alice
person.name = "Bob"
print(person.name)  # 输出: Bob
10.6.3 使用 __slots__ 限制属性
class MyClass:
    __slots__ = ['name', 'age']

obj = MyClass()
obj.name = "Alice"
obj.age = 25
# obj.gender = "Female"  # 会报错
11.文件
11.1. 打开文件
open() 函数语法:
open(file, mode='r', buffering=-1, encoding=None, errors=None, newline=None, closefd=True, opener=None)
| 参数 | 含义 |
|---|---|
file |
文件路径 |
mode |
文件打开模式(见下文) |
buffering |
控制缓冲区。0 表示无缓冲,1 表示行缓冲,>1 表示缓冲区大小。 |
encoding |
文本模式下的编码方式(如 utf-8) |
errors |
错误处理方式:strict、ignore 等 |
文件模式
| 模式 | 含义 |
|---|---|
'r' |
以只读模式打开文件(默认)。文件不存在会报错。 |
'w' |
以写入模式打开文件,清空原内容。文件不存在会创建。 |
'a' |
以追加模式打开文件。文件不存在会创建。 |
'b' |
以二进制模式打开文件。 |
't' |
以文本模式打开文件(默认)。 |
'x' |
创建文件并写入,若文件已存在则报错。 |
'+' |
可读可写模式(与 'r'、'w'、'a' 配合使用)。 |
11.2. 文件读取
读取整个文件内容:read()
with open('example.txt', 'r', encoding='utf-8') as file:
    content = file.read()
    print(content)
按行读取:readline() 和 readlines()
readline():一次读取一行。readlines():读取所有行并返回列表。
with open('example.txt', 'r', encoding='utf-8') as file:
    # 一次读取一行
    line = file.readline()
    print(line)

    # 读取所有行
    lines = file.readlines()
    print(lines)
迭代器读取
with open('example.txt', 'r', encoding='utf-8') as file:
    for line in file:
        print(line.strip())  # 去除末尾换行符
11.3. 文件写入
写入字符串:write()
with open('example.txt', 'w', encoding='utf-8') as file:
    file.write("Hello, World!\n")
    file.write("Python file operations.\n")
写入多行:writelines()
writelines() 接受一个字符串列表,将其逐行写入文件。
lines = ["First line\n", "Second line\n", "Third line\n"]
with open('example.txt', 'w', encoding='utf-8') as file:
    file.writelines(lines)
11.4. 文件追加
追加内容:write()
with open('example.txt', 'a', encoding='utf-8') as file:
    file.write("This line is appended.\n")
11.5. 文件定位与操作
获取文件当前位置:tell()
返回当前文件指针的位置(字节数)。
with open('example.txt', 'r', encoding='utf-8') as file:
    print(file.tell())
移动文件指针:seek()
with open('example.txt', 'r', encoding='utf-8') as file:
    file.seek(5)  # 将指针移动到第 5 个字节
    print(file.read())  # 从新位置开始读取
11.6. 文件关闭
- 手动关闭:file.close()。
- 上下文管理器:with open() 会自动关闭文件。
file = open('example.txt', 'r')
content = file.read()
file.close()  # 手动关闭文件
推荐使用上下文管理器:
with open('example.txt', 'r') as file:
    content = file.read()
# 文件已自动关闭
11.7. 文件检测和操作模块
os 模块
提供文件路径和操作功能。
import os

# 判断文件是否存在
print(os.path.exists('example.txt'))

# 删除文件
os.remove('example.txt')

# 重命名文件
os.rename('old_name.txt', 'new_name.txt')
shutil 模块
用于高级文件操作。
import shutil

# 复制文件
shutil.copy('source.txt', 'destination.txt')

# 移动文件
shutil.move('source.txt', 'new_directory/')
11.8. 二进制文件操作
处理非文本文件(如图片、音频)。
# 读取二进制文件
with open('image.jpg', 'rb') as file:
    data = file.read()

# 写入二进制文件
with open('output.jpg', 'wb') as file:
    file.write(data)
11.9. 文件异常处理
通过 try…except 捕获文件操作异常。
try:
    with open('nonexistent.txt', 'r') as file:
        content = file.read()
except FileNotFoundError:
    print("File not found!")
except PermissionError:
    print("Permission denied!")
11.10. 高级功能:临时文件
使用 tempfile 模块创建临时文件。
import tempfile

# 创建临时文件
with tempfile.TemporaryFile(mode='w+t') as temp_file:
    temp_file.write("Temporary data\n")
    temp_file.seek(0)
    print(temp_file.read())  # 输出: Temporary data
12.异常
12.1. 异常的基本概念
什么是异常?
- 异常 (Exception) 是程序运行时发生的错误事件,它会中断正常的程序流程。
- 常见异常类型:
ZeroDivisionError:除数为零。IndexError:索引超出范围。KeyError:访问字典中不存在的键。FileNotFoundError:文件未找到。ValueError:值类型不正确。
异常的基本结构
try:
    # 可能发生异常的代码
except:
    # 异常发生时执行的代码
else:
    # 没有异常时执行的代码
finally:
    # 无论是否发生异常,都会执行的代码
12.2. 异常捕获:try...except
基本用法
捕获异常并处理:
try:
    result = 10 / 0
except ZeroDivisionError:
    print("除数不能为零!")
捕获多个异常
可以通过元组捕获多个异常:
try:
    x = int("abc")
except (ValueError, TypeError):
    print("发生值错误或类型错误!")
使用通用异常类
捕获所有异常:
try:
    result = 10 / 0
except Exception as e:
    print(f"发生异常:{e}")
12.3. 异常处理的其他块
else 块
当 try 块没有发生异常时执行:
try:
    result = 10 / 2
except ZeroDivisionError:
    print("除数不能为零!")
else:
    print("计算成功,结果为:", result)
finally 块
无论是否发生异常,都会执行:
try:
    file = open("example.txt", "r")
except FileNotFoundError:
    print("文件未找到!")
finally:
    print("操作结束,无论是否发生异常。")
12.4. 自定义异常
可以通过继承 Exception 类创建自定义异常:
class CustomError(Exception):
    def __init__(self, message):
        self.message = message

try:
    raise CustomError("这是一个自定义异常!")
except CustomError as e:
    print(f"捕获自定义异常:{e.message}")
12.5. 捕获异常时获取详细信息
可以使用异常对象获取具体的错误信息:
try:
    x = int("abc")
except ValueError as e:
    print(f"发生异常:{e}")
12.6. 嵌套异常处理
可以嵌套多个 try...except 块:
try:
    try:
        result = 10 / 0
    except ZeroDivisionError:
        print("内部异常处理:除数不能为零!")
        raise  # 重新抛出异常
except Exception as e:
    print(f"外部捕获异常:{e}")
12.7. 异常的抛出:raise
手动抛出异常
可以通过 raise 手动抛出异常:
def check_age(age):
    if age < 18:
        raise ValueError("年龄必须大于 18!")
    return "年龄合格"

try:
    check_age(15)
except ValueError as e:
    print(f"错误:{e}")
重新抛出异常
在 except 块中重新抛出异常:
try:
x = 1 / 0
except ZeroDivisionError:
print("捕获异常后重新抛出!")
raise
12.8. 使用 with 语句的上下文管理
with 语句可以自动处理异常和资源释放:
try:
with open("example.txt", "r") as file:
content = file.read()
except FileNotFoundError:
print("文件未找到!")
12.9. 异常链:__cause__ 和 __context__
当一个异常由另一个异常引发时,可以通过异常链追踪:
try:
try:
x = int("abc")
except ValueError as e:
raise TypeError("类型转换失败!") from e
except Exception as e:
print(f"异常链:{e.__cause__}")
12.10. 常见异常类型
| 异常类型 | 描述 |
|---|---|
ZeroDivisionError |
除以零错误。 |
IndexError |
序列索引超出范围。 |
KeyError |
字典中没有指定的键。 |
ValueError |
传递的参数类型正确,但值不合适。 |
TypeError |
操作或函数应用于不适当的类型。 |
FileNotFoundError |
文件未找到错误。 |
IOError |
输入输出操作失败。 |
AttributeError |
尝试访问对象中不存在的属性。 |
ImportError |
模块导入失败。 |
StopIteration |
迭代器没有更多值时抛出的异常。 |
12.11. 异常处理的最佳实践
-
避免使用通用异常捕获
- 使用特定的异常类型以提高代码的可读性。
try:
result = 10 / 0
except ZeroDivisionError:
print("除数不能为零!")
-
始终清理资源
- 使用
finally或with确保资源释放。
- 使用
try:
file = open("example.txt", "r")
finally:
file.close()
-
添加适当的日志记录
- 使用
logging模块记录异常。
- 使用
import logging
try:
result = 10 / 0
except ZeroDivisionError as e:
logging.error("发生异常:%s", e)
-
避免过多嵌套
- 简化异常处理代码,提高可维护性。
-
自定义异常类
- 使用清晰的异常名称,提高代码的可读性和可调试性。
13.第三方库
13.1. 什么是第三方库?
- 第三方库 是指非 Python 标准库中的模块或包,由社区开发和维护。
- 例如:
numpy(数值计算)、pandas(数据分析)、requests(网络请求)、matplotlib(数据可视化)等。
13.2. 第三方库的安装
安装工具:pip
pip是 Python 的包管理工具,用于安装和管理第三方库。
安装第三方库
pip install 库名
例如,安装 requests:
pip install requests
指定版本安装
pip install 库名==版本号
例如,安装 numpy 的 1.21.0 版本:
pip install numpy==1.21.0
升级库
pip install --upgrade 库名
卸载库
pip uninstall 库名
列出已安装的库
pip list
查看特定库的信息
pip show 库名
13.3. 第三方库的导入与使用
导入库
使用 import 关键字导入库:
import numpy # 导入整个库
import pandas as pd # 使用别名
from math import sqrt # 从模块中导入特定函数
检查是否安装
try:
import numpy
print("库已安装")
except ImportError:
print("库未安装")
13.4. 管理项目依赖
生成依赖文件:requirements.txt
开发项目时可以记录所有依赖库及其版本:
pip freeze > requirements.txt
生成的 requirements.txt 内容可能如下:
numpy==1.21.0
pandas==1.3.3
requests==2.26.0
通过依赖文件安装库
pip install -r requirements.txt
13.5. 常用第三方库及示例
(1) 数据处理:numpy
- 用于数值计算和矩阵操作。
import numpy as np
arr = np.array([1, 2, 3, 4])
print(arr.mean()) # 求平均值
(2) 数据分析:pandas
- 用于数据清洗和分析。
import pandas as pd
data = {'Name': ['Alice', 'Bob'], 'Age': [25, 30]}
df = pd.DataFrame(data)
print(df.head()) # 查看数据表的前几行
(3) 网络请求:requests
- 用于发送 HTTP 请求。
import requests
response = requests.get("https://api.github.com")
print(response.status_code) # 查看状态码
print(response.json()) # 解析 JSON 响应
(4) 数据可视化:matplotlib
- 用于生成图表。
import matplotlib.pyplot as plt
x = [1, 2, 3, 4]
y = [10, 20, 25, 30]
plt.plot(x, y)
plt.show()
(5) 机器学习:scikit-learn
- 提供多种机器学习算法。
from sklearn.linear_model import LinearRegression
import numpy as np
model = LinearRegression()
x = np.array([[1], [2], [3]])
y = np.array([1, 2, 3])
model.fit(x, y)
print(model.predict([[4]])) # 预测值
(6) 爬虫工具:BeautifulSoup
- 用于解析 HTML 页面。
from bs4 import BeautifulSoup
import requests
response = requests.get("https://example.com")
soup = BeautifulSoup(response.text, 'html.parser')
print(soup.title.string) # 打印页面标题
13.6. 虚拟环境的使用
虚拟环境可以隔离项目依赖,防止不同项目之间的库版本冲突。
创建虚拟环境
python -m venv 环境名
激活虚拟环境
- Windows:
环境名\Scripts\activate
- macOS/Linux:
source 环境名/bin/activate
退出虚拟环境
deactivate
13.7. 第三方库的开发与发布
开发库
- 编写模块代码,组织功能。
- 创建
setup.py文件定义库信息。
示例 setup.py:
from setuptools import setup, find_packages
setup(
name="my_package",
version="0.1",
packages=find_packages(),
install_requires=[
"numpy",
"pandas"
],
)
发布库
- 将库上传到 PyPI。
- 打包项目:
python setup.py sdist
- 安装
twine:
pip install twine
- 上传项目:
twine upload dist/*
13.8. 常见问题及解决方案
(1) 安装失败
- 错误信息:
No matching distribution found- 解决方案:检查库名称是否正确,或升级
pip:
- 解决方案:检查库名称是否正确,或升级
pip install --upgrade pip
(2) 版本冲突
- 错误信息:
Cannot install package due to conflicting versions- 解决方案:使用虚拟环境或指定兼容版本。
(3) 运行时找不到库
- 错误信息:
ModuleNotFoundError- 解决方案:检查库是否已正确安装。
14.测试
14.1. Python 测试的分类
- 单元测试(Unit Test):测试单个功能或模块。
- 集成测试(Integration Test):测试多个模块的交互是否正常。
- 功能测试(Functional Test):模拟用户行为以验证系统是否符合预期。
- 性能测试(Performance Test):评估代码在特定条件下的性能表现。
14.2. 测试框架的选择
Python 提供多种测试框架,以下是常用框架及其特点:
(1)内置框架:unittest
- Python 内置的测试框架。
- 适合单元测试,支持测试套件和断言。
(2)第三方框架
pytest:功能强大,支持插件,简洁易用。nose2:unittest的扩展,支持发现和运行测试。tox:用于多环境测试。hypothesis:基于属性的测试,用于生成测试用例。
14.3. 使用 unittest 测试
(1)基本用法
创建一个测试文件,使用 unittest.TestCase 定义测试类和测试方法:
import unittest
# 待测试代码
def add(a, b):
return a + b
# 测试类
class TestMathFunctions(unittest.TestCase):
def test_add(self):
self.assertEqual(add(2, 3), 5)
self.assertEqual(add(-1, 1), 0)
self.assertNotEqual(add(2, 3), 4)
# 运行测试
if __name__ == "__main__":
unittest.main()
- 断言方法:
assertEqual(a, b):断言a == b。assertNotEqual(a, b):断言a != b。assertTrue(x)/assertFalse(x):断言布尔值。assertRaises(Exception, func, *args):断言代码抛出指定异常。
(2)测试套件
使用测试套件将多个测试组合在一起运行:
def suite():
suite = unittest.TestSuite()
suite.addTest(TestMathFunctions("test_add"))
return suite
if __name__ == "__main__":
runner = unittest.TextTestRunner()
runner.run(suite())
(3)组织测试
将测试文件放置在单独的目录(如 tests),通过 unittest 自动发现并运行测试:
目录结构:
project/
├── my_module.py
└── tests/
├── test_my_module.py
运行命令:
python -m unittest discover -s tests
14.4. 使用 pytest 测试
(1)基本用法
pytest 具有更简洁的语法:
# test_math.py
def add(a, b):
return a + b
def test_add():
assert add(2, 3) == 5
assert add(-1, 1) == 0
运行测试:
pytest
(2)测试失败时的调试
- 如果测试失败,
pytest会自动显示详细的错误信息:
assert 5 == 6
- 使用
-v参数查看详细信息:
pytest -v
(3)使用参数化
pytest 支持参数化测试,用于测试多个输入组合:
import pytest
@pytest.mark.parametrize("a, b, expected", [
(1, 2, 3),
(0, 0, 0),
(-1, -1, -2)
])
def test_add(a, b, expected):
assert add(a, b) == expected
(4)运行特定测试
通过关键字运行某个测试:
pytest -k "test_add"
14.5. 测试覆盖率
安装 coverage 工具
pip install coverage
生成覆盖率报告
coverage run -m pytest
coverage report
生成 HTML 报告:
coverage html
14.6. Mock 测试
基本用法
unittest.mock 模块可用于模拟依赖对象或外部服务:
from unittest.mock import MagicMock
def fetch_data(api_client):
return api_client.get("/data")
def test_fetch_data():
mock_api_client = MagicMock()
mock_api_client.get.return_value = {"key": "value"}
result = fetch_data(mock_api_client)
assert result == {"key": "value"}
14.7. 测试异常和边界情况
断言异常
import pytest
def divide(a, b):
if b == 0:
raise ValueError("Cannot divide by zero")
return a / b
def test_divide():
with pytest.raises(ValueError, match="Cannot divide by zero"):
divide(1, 0)
14.8. 性能测试
测量性能
使用 timeit 模块测试代码运行时间:
import timeit
def slow_function():
return sum(range(1000000))
execution_time = timeit.timeit(slow_function, number=10)
print(f"Execution time: {execution_time} seconds")
14.9. 自动化测试工具
集成测试工具
tox:自动化测试多个 Python 环境。pytest+ CI:结合 CI/CD 工具(如 GitHub Actions)实现自动化测试。
14.10. 测试最佳实践
- 使用虚拟环境确保依赖隔离。
- 测试用例覆盖所有代码路径,包括边界条件。
- 定期运行测试,确保代码稳定性。
- 将测试集成到 CI/CD 流程中。